


LS1 Head Swap
E-mail jmX with corrections
Click here for a printable version
| Tools Needed: |
- Set of metric sockets, deep and normal - Metric box wrenches - Metric "Gear" wrenches (not absolutly nessisary, but REALLY handy) - Stubby 15mm open ended wrench - 19mm box wrench - 8mm allen wrench - Torque wrench for 20ft/lbs up to 100+ft/lbs - Various socket extensions, ranging from 3" to 12" - Medium length socket wrench - Large 1/2" drive socket wrench - 15mm 1/2" drive socket, plus 3" and 6" 1/2" extension - Shop rags, roll of paper towels - Felt tipped marker - Plastic ice scraper (for windsheilds) - air compressor with air sprayer nozzle - standard wrenches for exhaust bolts (size depends on headers/ypipe) |
| Parts you will need: |
- 16 Long "M-11" Headbolts PN 12560744 - 4 Short "M-11" Headbolts PN 12560745 - 10 "M-8" Headbolts PN 12558840 (PN might be for bag of 5) - 2 Head gaskets PN 12558809(drivers side) and 12558810 (pass side) - 2 AIR tube gaskets PN 12553617 - 1 EGR gasket PN 12553047 - 6 quarts of oil, new filter - Water pump gaskets for 1998 model cars (PN 12559271 2 needed) - Jug of dexcool compatible coolant (or save your old stuff) |
| NOTES: |
|
A very common mod these days is to swap on ported heads. We went with heads from ARE and the heads came with the springs/valves pre-installed for our convienience...your heads will probably come the same way. Here are a few shots showing the difference between stock heads and the ported heads: |
 Intake port comparison |
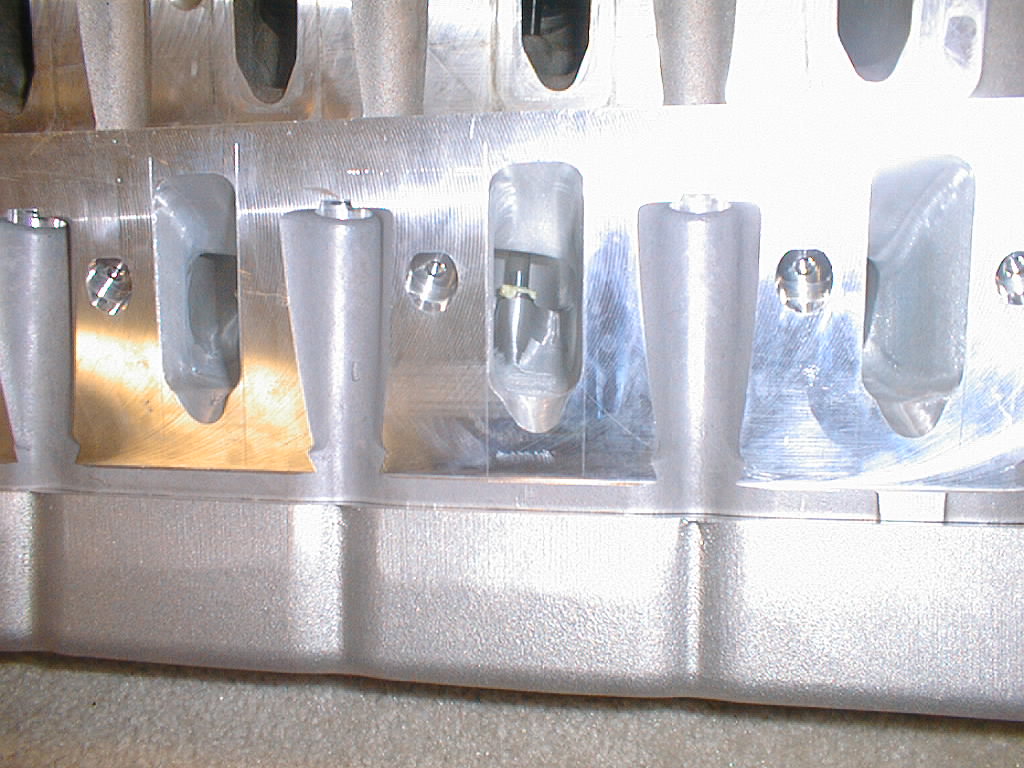 Ported intake ports |
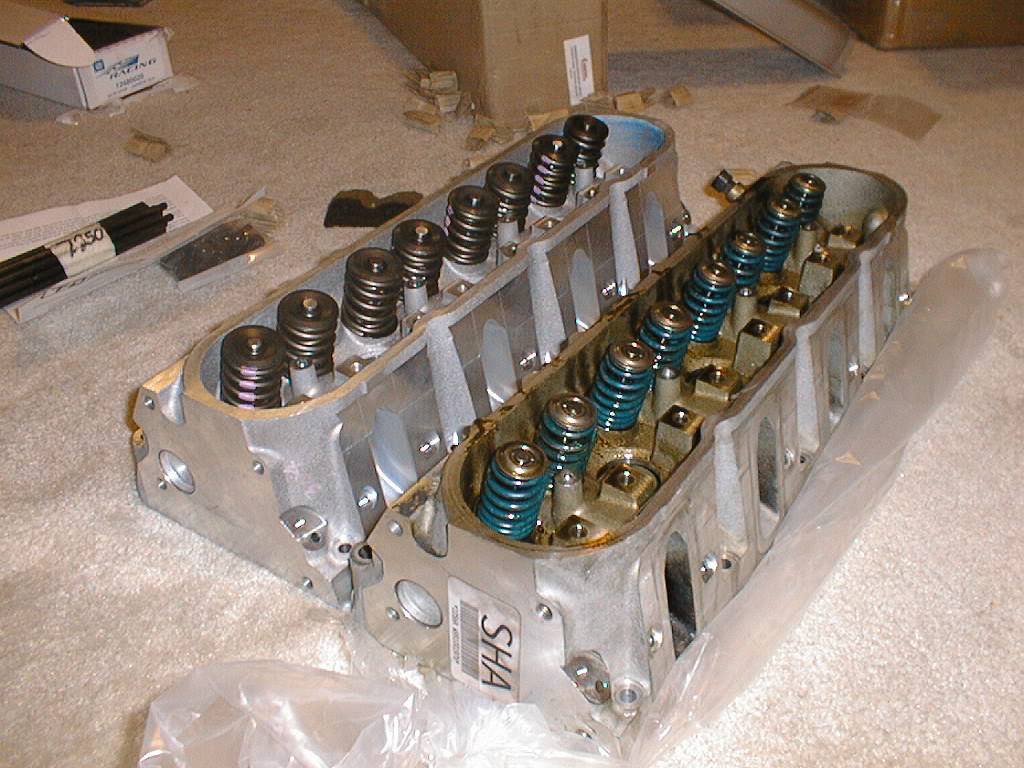 Kmotion (left) vs Hotcam springs |
 C5R valve covers with ARE logo |
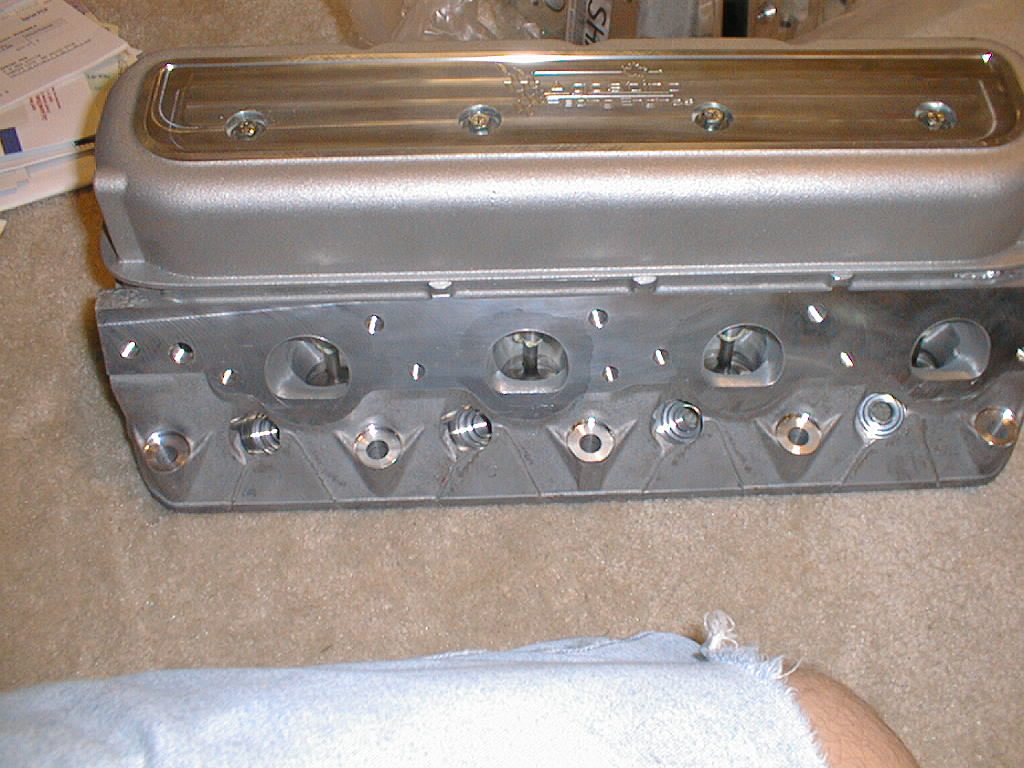
 Exhaust port comparison |
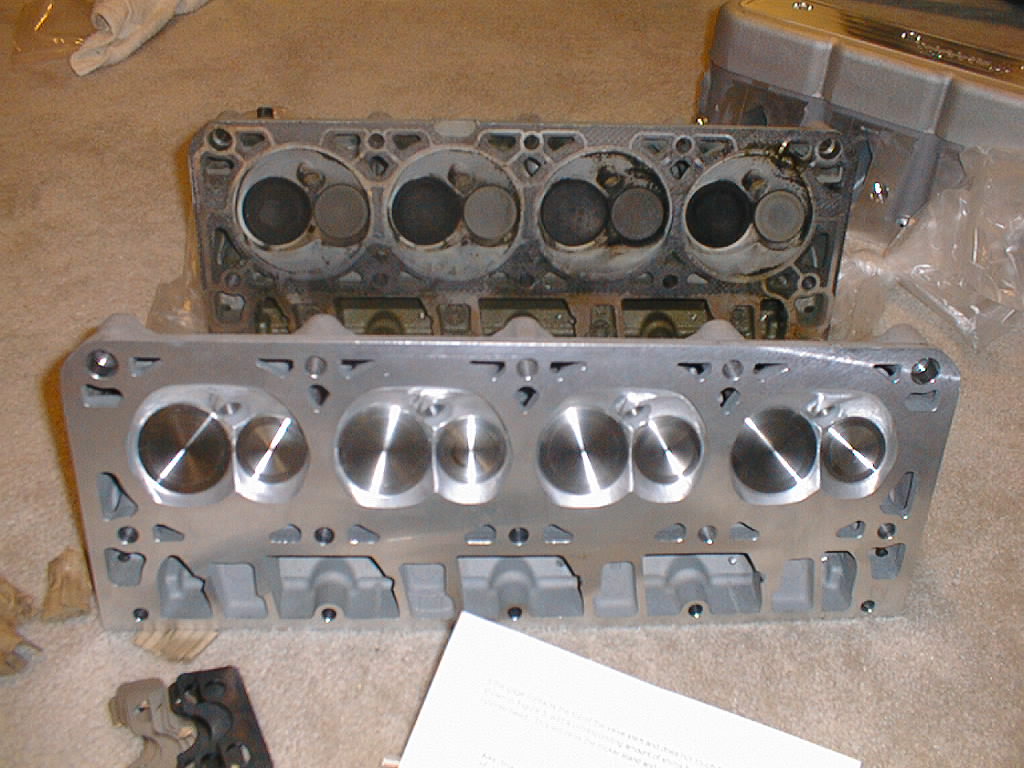 Valve comparison |
Lets begin:
|
Preliminary stuff:Disconnect the negative terminal on the battery and then start draining the radiator by opening the valve on the bottom passenger side of the radiator. Remove the air lid/MAF assembly. Disconnect the throttle cable and possibly the cruise control cable from your throttle body.
Remove the Intake manifold using the instructions I provide here. You can leave the fuel rail and throttle body connected to the intake manifold. Remove the coolant pipe(s) shown in the link as well and place them aside. Remove the AIR tubes by unbolting the air tubes from the exhaust manifolds/headers. There are 2 10mm bolts holding the tubes down. Once unbolted, unhook the tubes from the rubber hoses they are attached to. Use a screwdriver to pry off the plastic fastener. Remove the EGR valve by unbolting the 2 15 mm bolts holding it to the passenger side head. Then unbolt the 2 10mm bolts from the exhaust manifold/header and disconnect the electronics going to the EGR. Place assembly aside. Remove the coil packs by first disconnecting the plug wires, then unplugging the big plastic wiring harness, then unbolting the 5 double ended bolts holding the pack rail to the valve cover ('98 cars will have to remove each pack individualy). These bolts are 10mm and you'll need a deep socket to get to them. DO NOT loosen the "pointy" looking double ended bolts. The rear one on the passenger side is a real PITA....I never reinstalled mine after the first time I took it off...you shouldnt either. Remove the valve covers using an 8mm socket to undo the 4 bolts holing it to the head. Once loosened, pull the bolts up a bit...they wont come all the way out. Once loosened, pull the valve cover off. You'll need to unplug the PVC vent hoses from the backs of the valve covers...they will just pull right out. Take off Ypipe by unbolting the 2 bolts on the flange at the bottom of the headers. Our bolts were 9/16". Loosen the ypipe where it connects to the catback exhaust until you can get the ypipe free from the headers. Once free, remove the 12 bolts (6 on each side) holding the exhaust manifolds or headers to the head. |

|
Ok, now that all the basic stuff is out of the way, you should have something in front of you that looks like the picture on the left. Now start to unbolt all the rocker arms. Each one is held down by a single 8mm bolt. Keep the rockers in a clean place and keep them in the same order you took them off. In the picture on the left, you can see one side has all rockers removed, the other side has one removed. Once the rockers are removed, pull the pushrods straight out of the hole. |
|
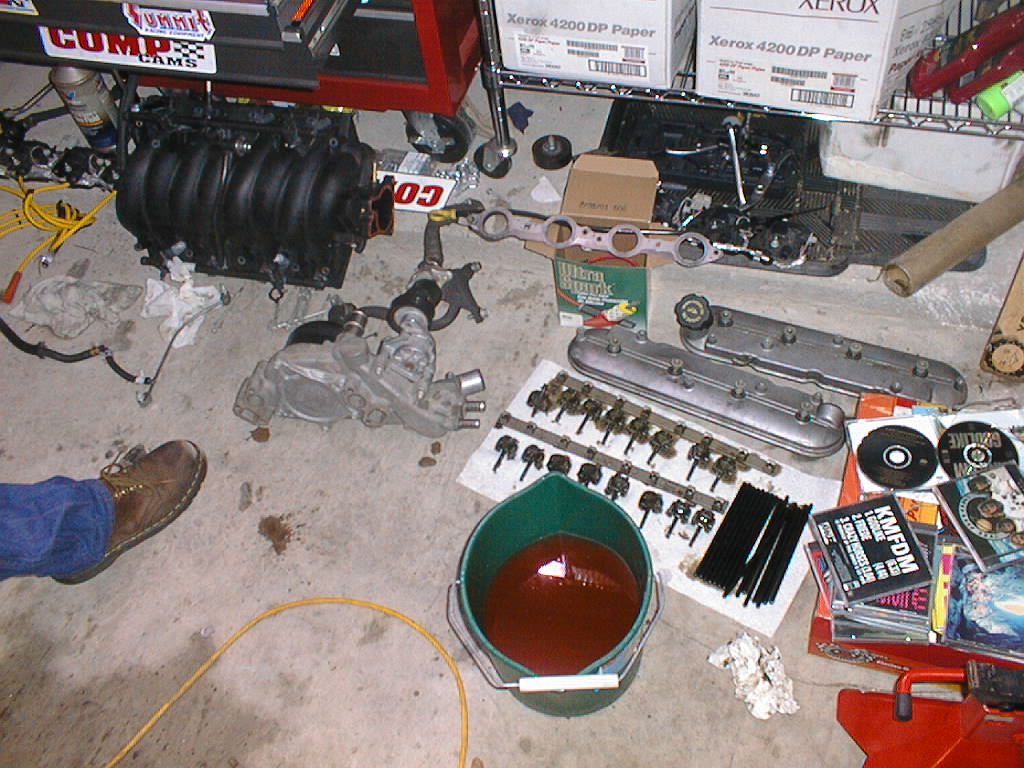
Next we need to remove the drive belt. Grab a big socket wrench with a 15mm socket, or a 15mm wrench and place it on the tensioner and pull/push it to loosen the belt....then remove the belt. Now go ahead and unbolt the water pump now. 5 bolts will be accessible with a 10mm socket wrench and 3" extension, and you'll need to use a box wrench (preferably a gear wrench) to get the 6th one. Support the water pump as you loosen the final bolts. Lots of coolant will be spilling out at this point so place something underneath the car if you dont want it to get on the ground. Now, you should have a collection of parts that is shown on the left. |

|
This part is fun....the removal of the power steering pump. Rather than remove the pulley and take the pump off the bracket, we'll just remove the whole unit assembled. This takes some patience...about 10 minutes of slow wrenching. Use the stubby 15mm wrench and using the open end, loosen each bolt a little at a time to slowly work the bracket slowly off the head. The bottom bolt will be a little hard to get due to a power steering line, but it can be gently held out of the way by a helper. The far drivers side bolt will also be a little blocked, and this is why you need to slowly work your way around the bolts and turn each one a few turns at a time...all while pulling the bracket off the head. It sounds complicated, but its not. You'll figure it out when you see it...its easy. The pic on the left shows the wrench on the bottom most bolt..just so you know it IS possible :)
Once the assembly is loose, tie it off to something in the engine bay to help support it. A wire tie works well for this, or a rope or bungee cord. Notice that all lines are still attached so no bleeding or draining is nessiary. |
|
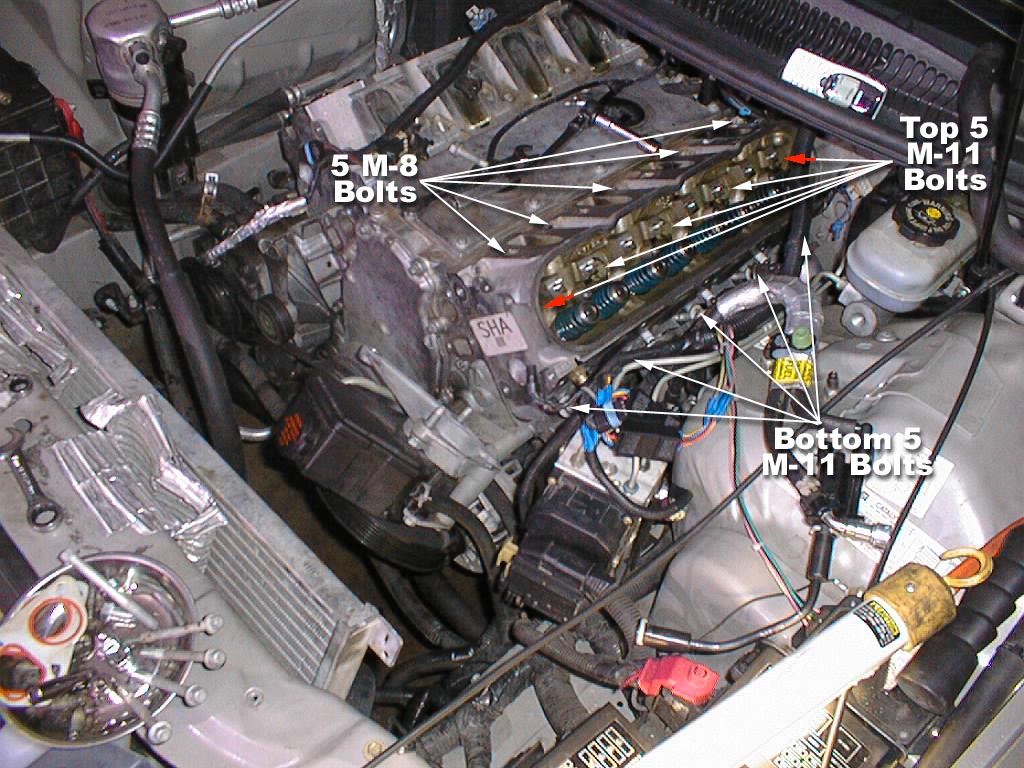
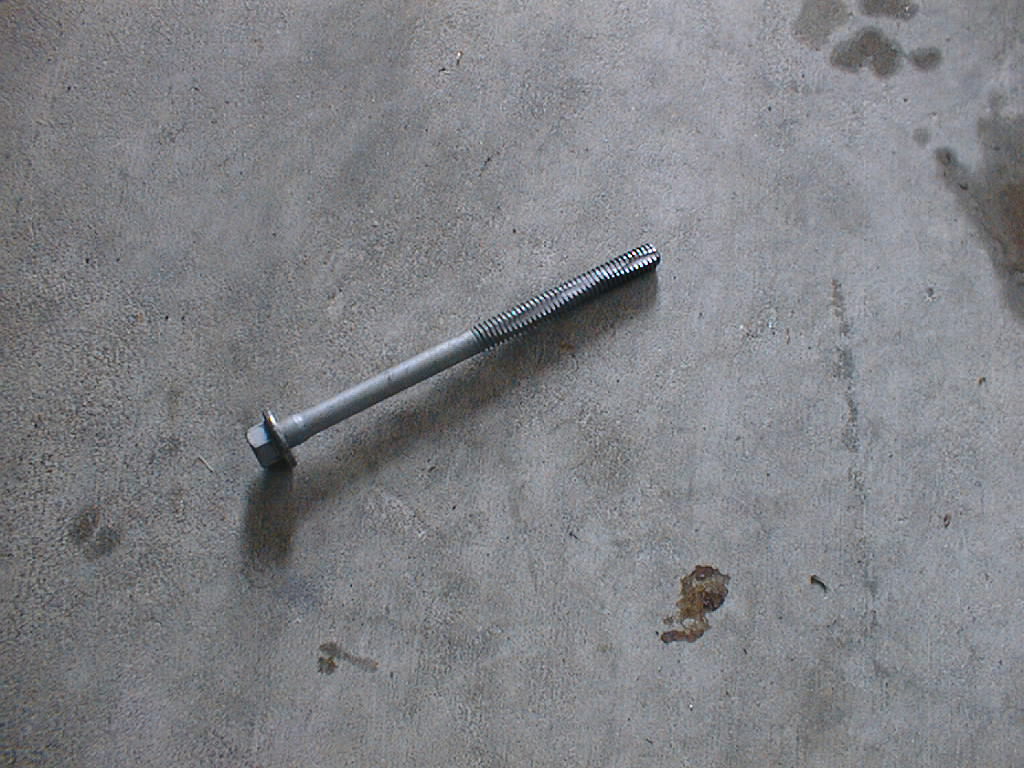
We're all ready to unbolt the heads now! First, you need to feel on the back of the heads and disconnect the various things attached to them. On the drivers side, there are *3* ground wires bolted to the head via 2 different bolts (2 wires are attached at one bolt, 1 at another). Use your stubby 15mm wrench and use your hand to feel where the 2 bolts are and remove those, making sure not to drop them. On the passenger side there is a wiring harness holder bracket attached to the head once again using a 15mm bolt. Use the stubby wrench to break the bolt free and remove it. Note, each car is a little different so dont be suprised if one head has nothing bolted to the back of it, and the other has 3-4 things bolted to it. 2000+ Cars will have a metal bracket on the drivers side head which again is held on by a 15mm bolt. There are 15 bolts holding each head to the block. Go ahead and loosen the 5 top "M-8" 10mm bolts...they will be fairly easy to break loose. Place them aside. Now, using a very large socket wrench (like one at least a foot long), loosen the 10 15mm "M-11" bolts and remove them. These will take quite a bit of effort. Once you loosen the bottom bolts you'll probably notice lots of coolant spilling out...dont worry about that, its normal. Notice in the picture on the left that the 2 red arrows point to the SHORT M-11 bolts...remember their positions since you'll need to put the short bolts in the right holes later on. |
|
Once a head is unbolted, go ahead and lift it off the block very carefully and set it aside on something soft. Ta-da! Thats it...a head is removed :) Simple huh? You should see a nice graphite gasket left on the block as shown in the picture. Coolant will be everywhere at this point. |
|
Pull the gasket off the block. Now grab a flat razor blade or gasket scraper and CAREFULLY start scraping any graphite off the block...you need the block surface to be VERY flat. I've found that a plastic ice scraper works GREAT for this...and since its plastic you wont screw up the soft aluminum block like you can with a razor. |
|
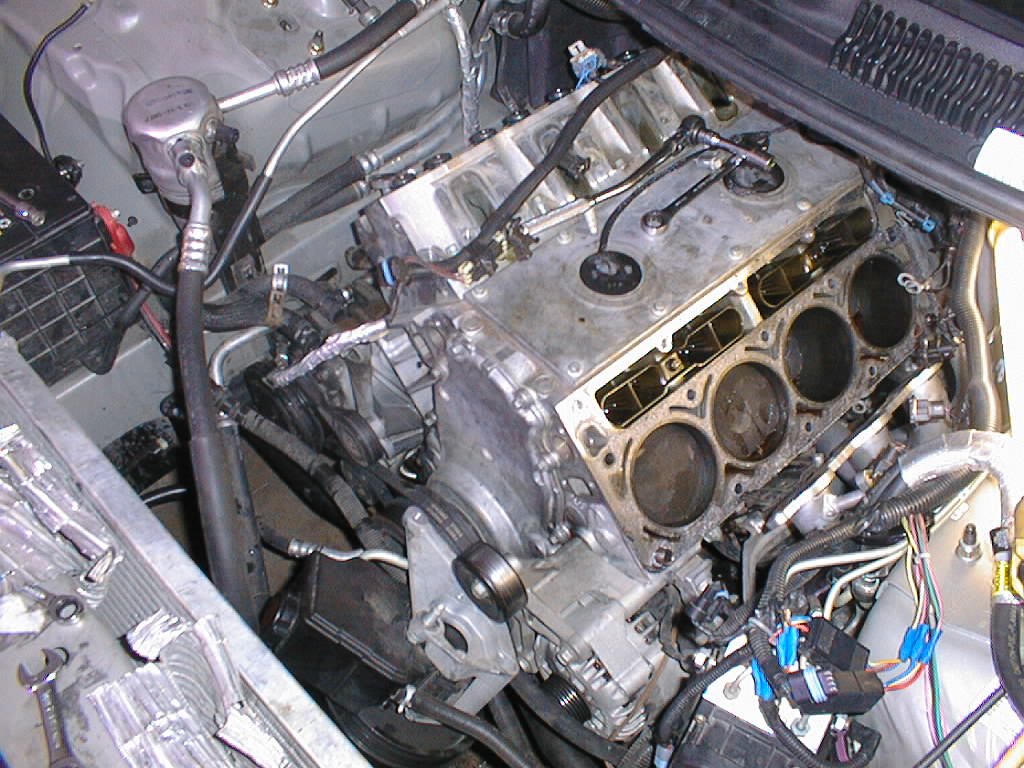
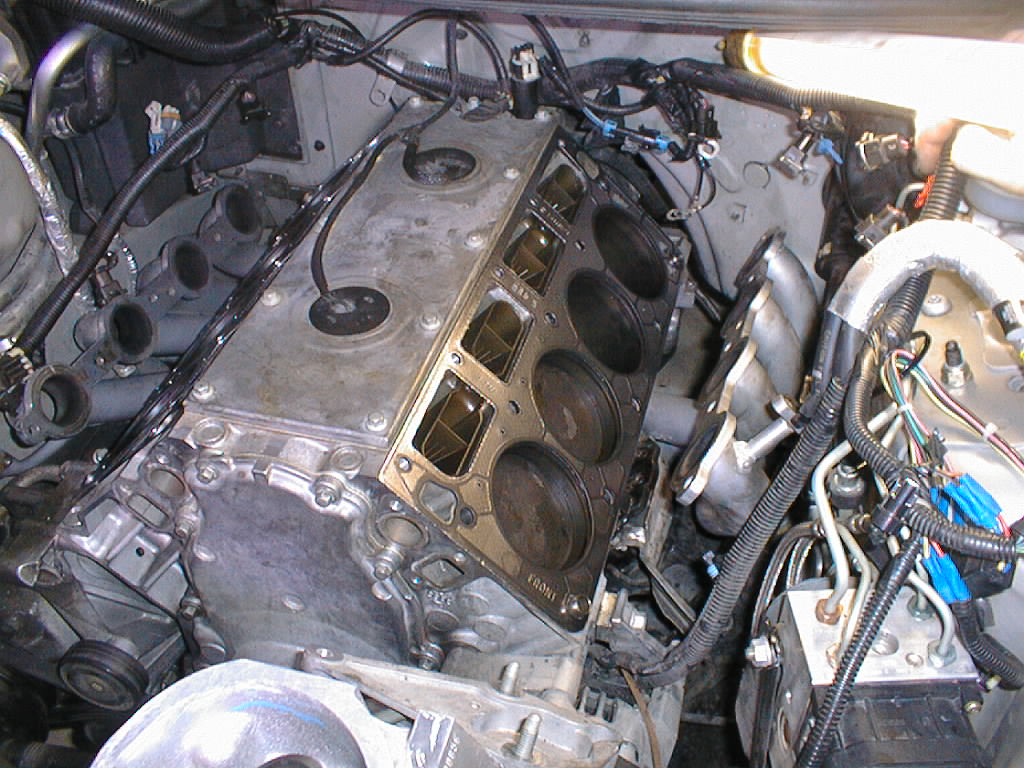
If you haven't already, pull the other side head off and clean its gasket surface as well. Now we get to begin the cleanup stage. This is the slow boring part of the work but is absolutly essential. Remember when all the coolant came spilling out during the head removal? Well, lots of that coolant went into the bolt holes....we must get that out there or we'll hydrolock the new bolts when we install the new heads, which would trash the threads in the block. YIKES. The pic on the left shows the LS1 motor with no heads on. Neat huh?
First step, grab some paper towels and soak up any coolant in the cylinders. Next, use compressed air to spray out the cylinders themselves and get the chunks of gasket out there. The cylinders should be VERY clean and dry after this. |

|
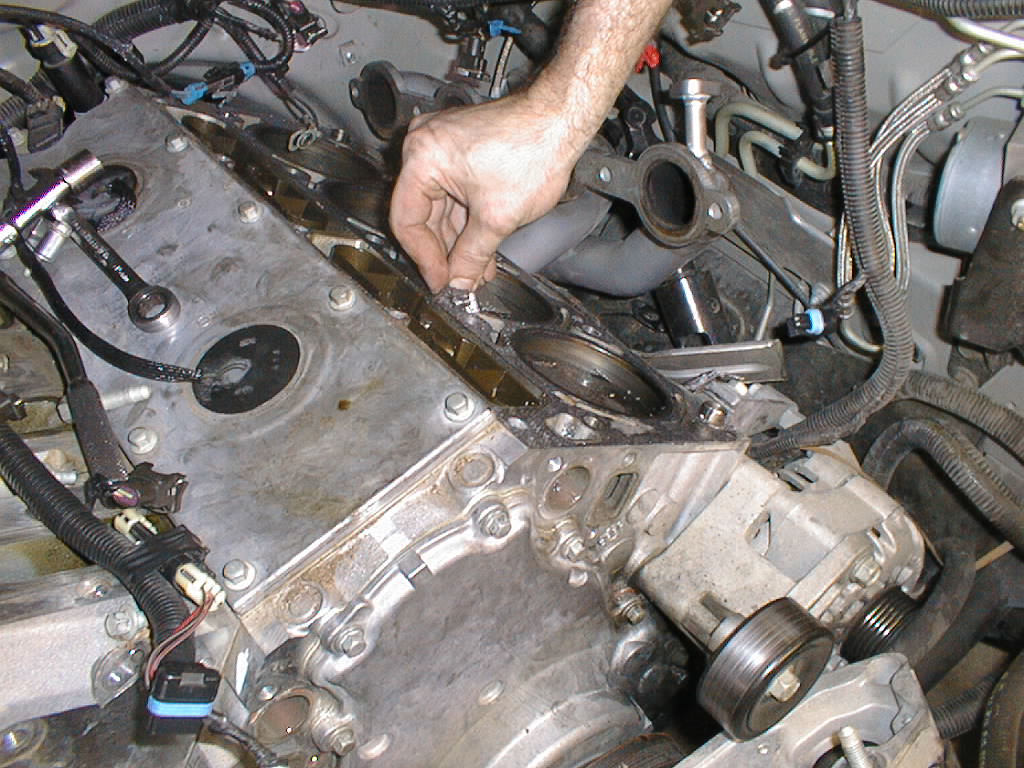
Now that the cylinders are clean, the bolt holes are next. I've labeled the holes we're talking about in the pic on the left. If you have a bright light, you should be able to shine it down in the holes and see coolant and gunk. |

|
To get all the coolant out of the holes, we found using rolled up paper towels work best....MUCH better than compressed air. If for some reason you still decide to try using compressed air, make SURE you dont get compressed air in the water jackets right next to the holes or coolant will fly everywhere.
So, roll up half a paper towel (or a whole one depending on towel thickness) and twist and push it down into each bolt hole and pull it out. You'll notice the bottom bolt holes come out with the paper towel saturated with water. Use scissors to cut off the wet bit and then reuse the rolled up towel. Repeat process until all 10 bolt holes are totally dry. |
|
Once the holes are dry we need to get any bits of gunk or old thread locker out of the threads. What we did was grind down the edge of one of the stock used bolts to give it 2 flat edges. In the picture on the left you can see one of the flat edges.
Now thread this cleaning bolt in each hole several times and clean the bolt each time. Repeat until the bolt comes out clean from each hole. This can take a while. |

|
Now, move the temperature sensor from the old drivers side head to the new drivers side head (heads are identical). This will require an open ended 19mm wrench. On the passenger side head there is a plug that closes the hole...move it over to the new passenger side head. It uses an 8mm hex (allen) wrench. These are shown in the picture on the left if you dont know what I'm talking about. |
| OPTIONAL CAM SWAP: |
|
Now, if you want to do a cam swap, this is the time. Unbolt the plastic pushrod guides from the block and the lifter should come out with them. Set them aside keeping them in the exact same order you pulled them out. Pull the crank pulley, unbolt the timing chain cover, unbolt the cam gear, unbolt the cam retainer plate, then pull out the cam and slide the new one in. For more details on a camswap you can read MBasketts site here: www.torquecentral.com Note that you wont have to follow his instructions exactly since the heads will already have the springs installed and there is NO danger of lifters falling since the heads are off. A cam swap would literally take less than an hour at this point :) Now back to the headswap..... |
|
Lay the new head gaskets in place. NOTICE how they go on...there is writing inscribed on them pointing to what should be facing front, what should be up, and what is visible. If you get these wrong you will block coolant passages so make sure you do this correctly. |

|
Now lay the new head in place, making sure to get the head correctly on the two dowels that are in the block (dowels are in the bottom bolt holes..furthest back and front most). Go ahead and start threading the M-8 bolts back in by hand. You can reuse the small M-8 bolts if you wish, but you need to apply some locktite to them (GM locktite PN 12345382). If you bought new M-8 bolts they come with locktite pre-applied. Remember where the 2 shorter M-11 bolts went in (top row, furthest back and furthest front) and hand thread those in...then put the 8 longer ones in once again by hand. |

|
Now, grab a socket wrench and lightly turn the bolts until they stop. Now for the very precice part. You need to get your torque wrench out now and fit it with a 3" extension and a 15mm socket.  Using the sequence illustrated above, torque all 10 15mm bolts to 22lb-ft. |

|
Ok, now for a GREAT tip from Scott99Z. Take a felt tip marker and draw a horizontal line on the head of each bolt. This is very important. Now, using the sequence illustrated above, turn all 10 15mm bolts an additional 90 degrees using a large socket wrench and a lot of muscle. Try to get as close to 90 degreees as possible...you may have to do multiple turns of 30 degrees or 2 turns of 45 degrees. When done all the lines on the bolt heads should be totally vertical. Next, again using the sequence above, turn bolts 1 through 8 another 90 degrees. This will take an immense amount of effort...if you have a buddy helping both of you should turn the wrench simultanoiusly. These 8 bolts will now all have horizontal lines on them Using the sequence above, turn bolts 9 and 10 an additional 50 degrees. Again, this will take a lot of effort. 50 degrees should result in a diagonal line on the bolts Finally, using the sequence above, torque bolts 11 through 15 to 22 lb-ft. |

|
Now that the heads are installed, its time to re-assemble the valvetrain. Drop the 16 pushrods in their holes, and reinstall the rockers. First torque each rocker down to 20-lbft, then do a 2nd pass and torque them to 24lbft. |

|
Once the valvetrain is installed again, reinstall the power steering/bracket assembly. This once again will take patience and slow wrenching with a stubby 15mm wrench.
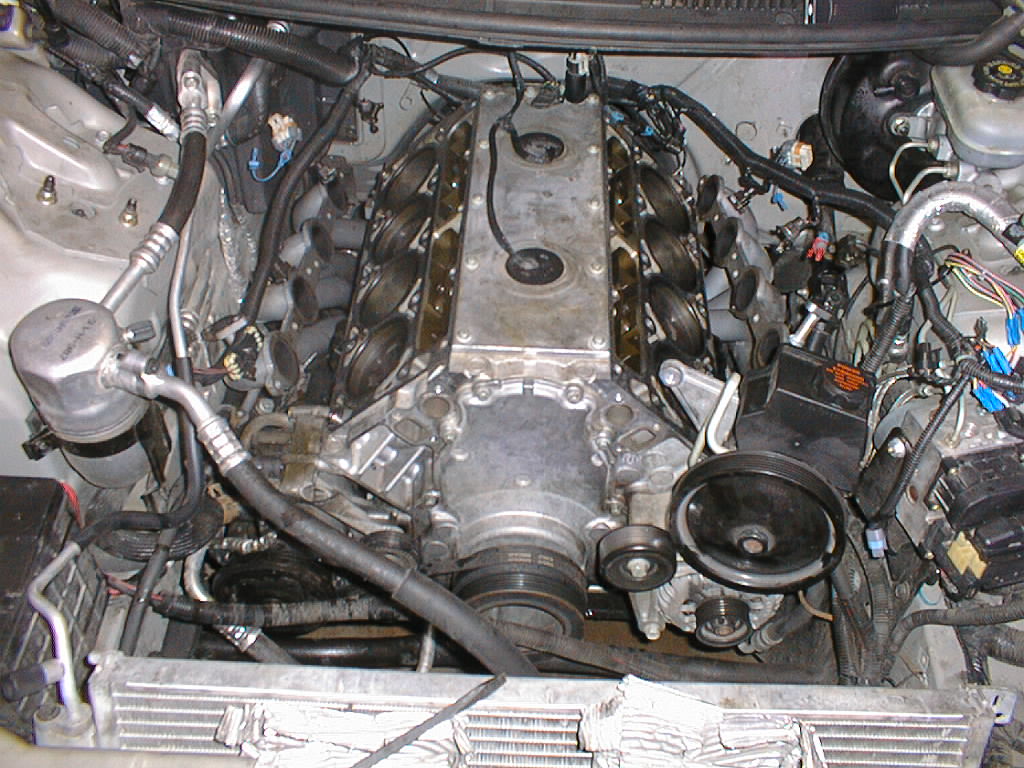
Once its attached, reinstall water pump. I found it easiest to place the 6 bolts in the water pump, lay the gaskets on the end of those bolts, then place the whole assembly on the block and hand thread the bolts in the holes. This ensures the gaskets will line up correctly. If you have a 1998 car you will need to use your new water pump gaskets here. Torque the water pump bolts to 11lbft in the first pass, then do a 2nd pass and torque them to 22lbft. Now rebolt up your headers/exhaust manifolds making sure to slide the metal gasket back between the manifold and the heads. Tighten these bolts down hand tight, or 18lbft. Your motor should now look like something on the left. |

|
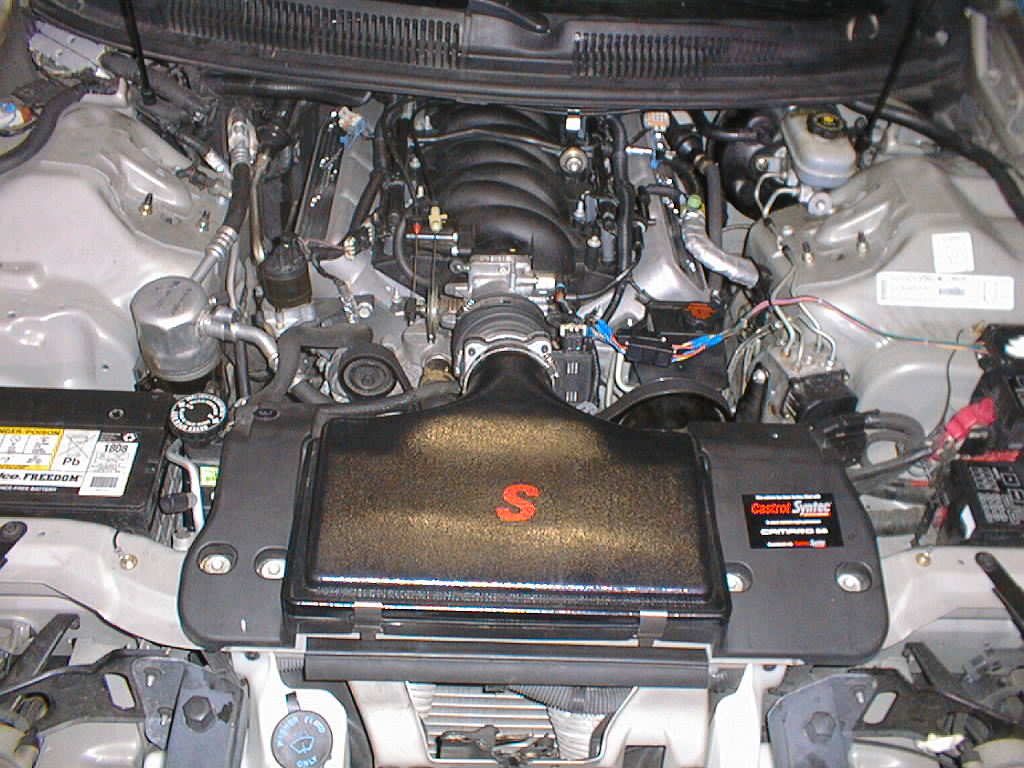
Reinstall your coolant pipes/plugs (2001 and up cars have 1 pipe and 2 plugs, 2000 and before cars have one big X shaped pipe), and reinstall your intake manifold. Re-attach your EGR assembly if you have it (once again, 2000 and before cars have EGR, 2001's and up dont.). Starting to look more like a motor now huh? :) |
|
Reattach the hoses going to the water pump and verify all coolant hoses are connected. There should be 2 big hoses and 2 small hoses total going to the radiator, and 2 big and 2 small going to the water pump. Fill the radiator back up with coolant and water, or whatever you drained out when you started (if you saved it). When refilling, disconnect the rubber hose going to the front coolant crossover pipe to let the air bubbles escape. Reinstall your drivebelt using the routing shown on the sticker in your engine bay Reinstall both valve covers and coil packs making the bolts hand tight...no need to over tighten this stuff. Reconnect spark plug wires, hook up coil pack wiring harness. Reinstall your ypipe and tighten the bolts VERY tight. Reinstall your air lid/maf. Hook up sensors on air lid, maf, TB, EGR, and radiator coolant level sensor (if a 98-99). Also make sure you plugged in your temperature sensor wire on the drivers side head. NOTE: The picture on the left has C5R valve covers which is why you dont see the coil packs. They have been relocated. This is NOT nessisary during a headswap...so ignore the "fancy" valve covers You are now ready to fire the car up! When firing it up for the first time, be VERY observant....watch your oil PSI, listen for any abnormal sounds, check for coolant leaks, etc. If all is well, go ahead and go out for a test drive taking things easy. Slowly try working your way up the rpms...if 2000 is good, try 2500rpms, etc. After 100-200 miles, go ahead and drain all the oil to get any spilt coolant, gasket chunks, dirt, etc out of the oil and you are set to go! |
| Final thoughts: |
| Well, I've done a headswap 4 times now and each time I was amazed at how easy this job actually is. There are no tricky parts, and the only part that takes effort is cleaning the bolt holes and torquing the heads down right. If you are handy with tools and have everything listed above, this swap should be a piece of cake. |