


Yella Terra Rocker Install
E-mail jmX with corrections
Click here for a printable version
| Tools Needed: |
- 8mm socket, 10mm deep socket, socket wrench - 3" socket extension - 10mm gear wrench (HIGHLY recommended, but not absolutely needed) - Flathead screwdriver - Torque wrench |
| Parts you will need: |
Parts: - Yella Terra Rockers for LS1 based engines Bolts/gaskets: - POSSIBLY needed for F-body only: 2 AIR tube gaskets GMPN 12553617 Supplies: - Medium strength locktite (optional) |
Intro:
|
There are a few reasons one would want to install aftermarket rockers. First, on very rare occasions the stock rocker arms have been known
to fail and spill their roller bearings into the engine. Second, the stock rockers will flex when using stiff springs and you will give up
some of your lift. Third, aftermarket rockers are sometimes adjustable and usually have a roller tip as well as a roller fulcrum (our stock
rockers already have a roller fulcrum). In this document I will detail how to install Yella Terra 1.7:1 ratio LS1 rockers. These rockers were
installed primarily to try to quiet down the valvetrain a little bit and nothing more, however, with the less flex the valve lift should see
about a 20 thousanths increase over a stock LS1 rocker and that may also add a few horsepower to the car. The only caveat to this is that if
you have a car that is on the ragged edge of piston to valve clearance, aftermarket rockers may just push you over the threshold. So, on to some pics of the parts: |
 The YT rockers
|
 YT vs. OEM
|
|
 YT vs. OEM
|
 YT's pedestals
|
Let's Begin
 |
Ok, first things first, if you have fuel rail covers pull them straight off and set them aside. You should see 4 coils on each valve cover. First unplug the coil pack end of the spark plug wires by pulling down on the boot of the wire. You can leave the other end of the wire attached to the plugs. Also disconnect the wiring harness weather pack connector for the coil packs. There is one per side. Now, on '99 and up LS1's there will be the 4 coils all one black metal rail. That metal rail is held to the head via 5 double ended bolts. These are 10mm and will require a deep 10mm. On an F-body (Firebird/Camaro), the rear one will be a BEAST to remove, so be patient....a 10mm gear wrench is highly recommended. On a Y-body (Corvette), the front drivers side bolt may be tough to get at due to the alternator. Again a 10mm gear wrench comes in handy here. On 2000+ cars there may be a bracket bolted to the back of the drivers side coil pack rail...you'll need to take a nut off the end of the coil pack bolt, then pry the bracket up and off (it'll be difficult), then unbolt the coil pack bolt. This is unfortunately a pain in the butt for 2000+ cars. On an '97-'98 LS1 each coil pack will be individually bolted to the valve cover. Unbolt all 4 coil packs and remove. F-Body Note: It may be hard to get to the coil pack bolts and plug wires on an F-body, depending on your year. This may require the temporary disconnection of your AIR tubes. The air tubes bolt to the exhaust manifolds using 2 10mm bolts. Using some extensions and a 10mm socket, you should be able to unbolt the air tubes from the exhaust manifolds and just push them out of the way (you can leave the rubber hose attached to the ends of the tubes). BE CAREFUL as these AIR tube gaskets are graphite and notorius for breaking. |
 |
You should now have some bare valvecovers in front of you. Each year will look a little different, but the majority will look
very similar to what I show in the picture on the left. On the drivers side at the very rear there will be a rubber grommet
and a plastic PCV fitting pushed into the grommet. LS6 cars will not have this. If you have it, pry the hose fitting up and out
of the grommet. On the passenger side, remove any hoses going to the top of the valve cover by pulling them off the valve cover fittings. Once the valve covers have nothing else attached to them, unbolt them. '99+ cars will have 4 centerbolt valve covers. An 8mm socket will be needed. Note:The centerbolts will not back all the way out, just unbolt them until they are loose. On '97-'98 LS1's you will have some bolts around the perimeter of the valve cover you'll need to remove. Once the valve covers are unbolted, remove them. |
 |
Before you proceed, this next part is VERY important! Now, we need to find ONE cylinder that is on its compression or combustion stroke...in other words, both valves for one cylinder need to be totally shut (the spring will be as tall as it possibly can be, and the rocker arm should not be pressing down on the valve at all). There are multiple ways of doing this, which I will detail here: 1) The guess method: This method is the easiest. By looking at the rockers and springs you can make an educated guess at which PAIR are totally shut. You may be able to confirm that they are shut by removing those 2 rocker arms and seeing if the spring decompresses at all as you unbolt the rocker arm (it shouldn't). Sometimes the engine will be in a position making this method unreliable 2) The F-body method: Using a 24mm socket and a big wrench, you can turn the motor over by hand via the crankshaft pulley bolt in the center of the main pulley on the engine. While turning the bolt clockwise, you can watch the valvetrain move up and down. You'll see the exhaust valve spring compress......then it will come up and the intake valve will compress....and right after the intake valve comes back up the valves should stay shut for a bit. That will be a good place to stop turning the engine. 3) The starter method: This method is pretty difficult because the starter turns the engine so quickly, but it can be done. Have one person stand by the engine bay and watch a particular cylinder (any cylinder) pair of rockers. Have the other person turn the key on for a split second, and do this a few times until the other person can tell what the engine is doing (The order is: exhaust valve opens, exhaust valve closes, intake valve opens, intake valve closes...then both valves stay shut for a bit). Once you get the pair of rockers you were looking at to be in their totally shut state you can stop. Again, this may take a few tries as the starter turns things quick! 4) The wheel turning method: I don't really recommend this method as it seems to be too much hassle, but you can jack the rear of the car up, put the car in 1st gear and turn BOTH the rear wheels to turn the engine over and have a 3rd person watch the valvetrain until you have a cylinder with both valves totally shut. |
 |
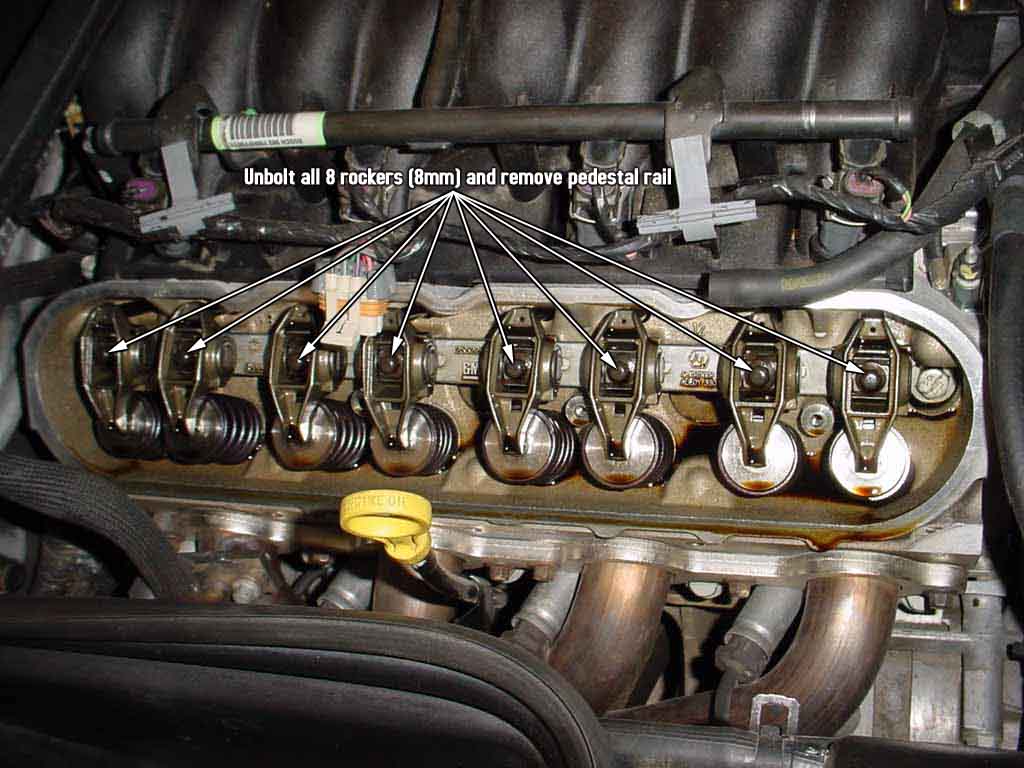
Once you have a cylinder with both valves shut, REMEMBER IT and don't move the engine anymore! Now go ahead and unbolt all 16 rockers by removing the 8mm
bolt that goes through the center of them. Once all the rockers are removed you can pull out both of the rocker pedestal rails as well. Note: Now is a good time to pull out and check your pushrods for straightness if you feel like it, otherwise you can just leave them in the engine and not worry about it. |
 | Here's a picture of what all you should have removed (the picture shows only one side of the engine's worth of parts). Pull the 8 bolts out of the rockers and set them aside as they'll be the only parts we'll be reusing. |
 |
Now, grab a yella terra rocker pair, 2 yella terra pedestals, and 2 shims from the box. Push the stock bolts through the top of the
rockers down through the bottom, place the rocker pedestal over the threaded part of the bolt and butt it up to the bottom of the rocker.
The skinny part of the pedestal goes towards the rocker arms. For now, leave the shims off |
 |
Now, remember that one cylinder you made sure had both valves shut? Well, install this rocker pair onto that cylinder. To keep
the pedestal from falling off, you'll need to hold it as shown in the image....thumbs against the rocker arm bolt heads, index fingers
holding the pedestals up, and then manually line up the 2 bolts with the 2 bolt holes. Note: If you have ported heads, you may want to place some locktite on the bolt threads before install to help the intake ports seal. For stock heads, locktite is less needed. |
 | Once the rockers are sitting in the right place, use a 10mm socket and extension but NO SOCKET WRENCH, and finger tighten the rocker arm bolts until both of the bolts get too tough to spin with 2 fingers. You can take your index finger and try to spin the pushrod under the rocker arms as well, and it should have some friction on it and just barely spin, if spin at all. This is called "Zero Lash" and it is where there is no preload on the lifters....the lifter is touching the pushrod, the pushrod is touching the rocker, and the rocker is touching the valve, all without putting any pressure on the lifter. |
 |
NOW, get your socket wrench out and attach it to the 10mm socket+extension you were using. Without turning the bolt AT ALL, place
the wrench in the 12 o'clock position. What we have to do is count the bolt turns until the instant the bolt gets hand tight. Turn each of the two bolts 90 degrees
clockwise, then set the wrench at 12 o'clock and repeat (do each bolt one 1/4 turn, and keep alternating).....each 1/4 turn per bolt seems to equate about 10-12 thousandths preload (this is a very rough guess!). If you get MORE than 1 full 360 degree turn on each bolt, remove the rockers and install the shims on the bottom of the pedestals and repeat this process to check the new preload. The shims seem to reduce the turns by approximately 270 degrees. You must install a shim on BOTH bolts, not just one or the other. If you got LESS than 1 full 360 degree turn then you are ok to leave the shims out! Every car will be different so make sure you check this! You want the smallest number of turns you can get, as long as you have at least 1/4 or 1/2 full turn of preload in there once you are all setup. If you get to the point where the bolt is tight yet you can still spin the pushrod (without using shims), then your pushrods are either too short, your valves are too short, or you have some strange valvetrain geometry. You MUST have some preload or it will be OBSCENELY loud and run very poorly. Longer pushrods may fix your issue in this case. |
 |
Now that we know if you need the shims or not, we don't need to do ANY of that legwork above on the other 7 cylinders...we can just throw the
rockers on and go (either using the shim or not, depending on what you found out above). So, do just that....bolt up all the other 7 pairs of rockers
(if you have ported heads, you may want to use a little locktite on the bolt threads).
Remember, since these other cylinders are in totally random positions, it is 100% normal for the rest of the rockers to compress some valve springs
as you start to tighten the bolt down, since these valves aren't all shut. Using a small socket wrench, tighten all these bolts down.
You should be able to feel when the rocker seats itself as the bolt will stop turning if you are using a small socket wrench. Once the rocker arms are all seated, get your torque wrench out and set it to 22lb/ft and torque all 16 rocker arm bolts to 22lb/ft. Go over the bolts a couple times to make absolutely sure they are torqued to spec. |
 | From here it's all down hill. Bolt your valve covers back on. There is no need to torque the bolts down very tight on the centerbolt valve covers...8 lb ft at most (or just lightly hand tight...remember they use a soft rubber gasket). Re-install your coils or your coil pack rail, and this time leave out your hard to get to bolts to make life easier on you next time. On an F-body, you may find it easier to reconnect your rear passengers side spark plug wire before you bolt the coil pack rail down. On a Y-body you can just reconnect all 8 wires after you bolt the coils on. Reconnect your coil harness connector, your PCV connections, and your AIR tubes if you removed them (along with new gaskets if your stock ones came out damaged). |
That's it!
| As you can see, this was a pretty painless install. Setting up the initial pair of rockers was really the only trick, and once that is done its easy sailing from there. Go ahead and fire up the car (it should be really noisy for a second, then quiet down) and let it idle. Listen for any abnormal ticking noises that you didn't have before. When we fired up the car, we found the valvetrain to be slightly less noisy than before (the car has a Comp Extreme energy lobed cam in it, so valvetrain noise is an issue), but otherwise idled and drove just like before. Very painless and fun install! Hope you enjoyed it. |