


F-Body Cam and Valvespring Swap
E-mail jmX with corrections
Click here for a printable version
Table of contents- Tools/Supplies needed- Preface - Cam Selection - Part1: Stripping down the engine - Part2: Removing the cam - Part3: Installing new springs - Part4: Final reassembly - FAQ |
| Tools Needed: |
- Set of metric sockets, deep and normal (8/10/12/15 may be needed) - Set of Metric wrenches (8/10/12/15 may be needed) - Large 1/2" drive breaker bar - 1/2" drive 24mm socket - Recommended: Metric "Gear" wrenches - Torque wrench for 20lb/ft up to 150+lb/ft (or more if possible) - Various socket extensions, ranging from 1" to 6" - Medium length socket wrench - Piece of pipe to slip over breaker bar handle - 3 armed pulley puller - Medium sized pliers (for hose clamps) - Medium sized flat head screwdriver - 3+ gallon Bucket - JPR Cam install tool from  (recommended) (recommended)OR - 16 retractable pen magnets with pocket clip - Valve spring compressor: There are several to chose from. Scoggins Dickey sells a nice one, the MORE tool (sold at Thunder Racing) is also handy for the hard to get springs, or the small screw/arm style compressor from an autoparts store will work well. - Recommended: Air compressor and leak down spark plug hole fitting for air hose - Optional: Flywheel locking tool (for automatic transmission cars only) - Highly Recommended: Longer crankshaft pulley bolt, M16 x 2.0 pitch x 120mm long |
| Parts/supplies you will need: |
Parts: - 1 Camshaft (Available from )
- 16 valve springs - Recommended: 2-3 spare locks (GMPN 10166345) - Recommended: 16 hardened pushrods (7.350" or 7.400" are very common lengths) - Recommended: 3-4 spare retainer locks in case you lose some - Optional: New retainers (some springs will require new retainers!) - Optional: Spring seats (some setups may need the spring seats to be changed, talk to your vendor for details) - Optional: Valve stem seals (if you need to change the spring seat, new valve stem seals are recommended) 8x GMPN 12533586 for Int Seal(Black) GM# 12457652 Exh Seal (Brown) - Optional: Underdrive crank pulley - Optional: blueprinted oil pump - Optional: New timing chain/gears Bolts/gaskets: - 2 AIR tube gaskets (2x GMPN 12553617) - 2 Water pump gaskets (optional on 99+ ls1's, required on '98 ls1's with stock gaskets)(2x GMPN 12559271) - 1 front engine seal (1x GMPN 12561244) Supplies: - 6 quarts of oil - new oil filter - Jug of Dex-cool® compatible coolant - RTV Hightemp silicon gasket maker - Loctite® (red tube, medium strength) - Anti-Seize |
Preface
| By far, one of the
best mods you can possibly ever do to your LS1/LS6 is to install an
aftermarket camshaft in it. Gains from various camshafts can range anywhere
from 20rwhp to 60+rwhp for more radical cams. For gains this amazing, it
must cost an arm and a leg right?!? Well, the beauty of swapping in a new cam
is the hp/dollar ratio. A good cam package can range anywhere from $650 up
to $1000 depending on what components it includes. The great price, the great gains, AND the fact you can install all these parts yourself in your own garage make this modification probably one of the most popular ones done on LS1/LS6 based engines. |
Selecting a cam that is right for you
Cam Basics:When deciding which camshaft is right for you, the best you can do is try to make an educated guess based on previous experiences or other's experiences. There are countless books about camshaft design and theory, so trying to explain what all to choose is pointless and this is why vendors are out there to see what works well in the LS1 for us. They do the research, and thus, they get our money.When buying a cam, you'll see specs like "220/224 0.550/0.558 114lsa". The first two numbers are intake duration (in degrees) followed by exhaust duration (in degrees). The next two numbers are valve lift for the intake (in inches) and valve lift for the exhaust (in inches).Finally, the last number is the Lobe Separation Angle. Duration:Duration really plays a big factor in how the cam will drive and idle. The bigger the duration, the longer the valves stay open, and generally the 'lopier' and worse driving the cam will be. The numbers you'll usually see are the duration in degrees that the valve is open MORE than 0.050" of an inch. Cam cards will also list duration at 0 lift, and that will be a number like 270-290'ish. Cams that have the same duration for intake and exhaust are symmetrical, cams with more intake than exhaust are called "reverse split", and cams with more exhaust than intake are sometimes referred to as "traditional split".LSA (Lobe Separation Angle):Lobe Separation Angle, usually referred to as "LSA", is the angle of separation between the exhaust peak and intake peak. The lower the angle, the more the lobes will overlap, and that means more lope, gas smell, and drivability issues...however, the lower LSA can also mean more power and you get it sooner in the RPM range to boot. Duration and LSA are 2 very important items in clueing you into how a cam will idle and drive, although there is a LOT more to a cam than this.Lift:Cam lift, in my opinion, is less of a complicated matter on these motors. There's not much of a reason to run less than 0.550" of valve lift, so anything between 0.550 and 0.600" is probably going to be fine. If you have ported heads, it may be best to lean towards cams with 0.570" lift and up as most ported heads will just keep flowing more and more as that valve lift increases. Note that a cam card will show lobe lift, which is the actual lift of the cam lobe. Once you take lobe lift and multiply it by the ratio of the rocker arm (stock is 1.7), you get valve lift.Lobe ProfileThe Lobe profile of a cam basically is the curve at which a valve is opened and closed. Some lobes are very EXTREME and will snap a valve open very quickly and then slam it shut, while others are "softer" and slowly open and close valves. The more extreme the lobe, the noisier your valvetrain will be and the harder it is on your valve springs...however, a more extreme lobe will generally idle better than a less extreme lobe with the same duration at 50 thousandths. If your cam has very aggressive lobes and your cam lift is up there, I'd suggest you try to lighten your valvetrain by getting titanium retainers if possible.Choosing the cam for youFor cars that need to stay stock sounding and driving, but still want a kick in the pants for horsepower, something between a 214 and 220'ish duration would probably be best. For the majority of the cars out there, anything in the 221-227 range is probably a better selection, and for the guys that want all they can get 228+ duration cam shafts are generally the minimum. As a novice all you can do is ask around, listen to cars, look at track/dyno results, and make your best guess. As long as you pick a cam close to what might fit you (i.e. mild, average, or extreme given the criteria above) you really can't go wrong. It's not a life or death decision here. A few degrees here and there isn't something you should sweat about until you've gotten a few cams under your belt and know more about what you want.Choosing the valvetrain upgrades:Now, you can't just throw a cam in and call it a day. At the BARE minimum your valvesprings *must* be replaced with stiffer ones. Whoever sells you the cam can also recommend a spring to go along with it...this is what vendors/shops are for, so you don't need to worry about being an expert on this (although it's not very complicated if you want to learn). Some springs will require aftermarket retainers (it's kind of a hat that sits on top of the spring), some won't, but in general if you go with a very aggressive cam and plan on spinning the engine up past 6600rpms I'd recommend getting Titanium retainers to help reduce the moving mass and keep the valvetrain moving crisply.Next there are spring seats and valve seals....some spring setups may require you change the spring seat and install new valve seals as well. If your vendor requires you install this, I will cover their install in this document as well. Hardened pushrods will also be highly recommended, although quite a few have just stuck with the stock pushrods and not had issues. Having said all that, let's assume you've made your choices, placed your order and are now ready to install the parts! |


The parts

|
Here are the most common parts
installed. The camshaft, 16 valve springs, and 16 hardened 7.400" pushrods. Optionally, your kit may have come with valve seals (8 black, 8 brown), 16 valve seats, and/or 16 retainers. |
Part 1: Stripping down the engine
Time To Complete: 1-2 hours

|
Drive your car up on ramps or lift the front end and place jackstands underneath, and pop the hood. If you have a strut tower
brace installed, now is the time to remove it (each STB is a little different, but most will just be held on by 4 nuts, 2 on each
side of the car). Go ahead and also disconnect the negative battery cable at this time. If you've programmed a theftlock code into your OEM radio, make SURE you know what the code is or else you'll be cruising without tunes once you reconnect the battery. |

|
Warning: If the engine has been running a while just prior to this, let the coolant cool off first.
Now we need to drain the radiator. First, carefully remove the radiator fill cap. Next, get under the front passenger side of the car and look for the petcock valve on the radiator. Twist the valve counterclockwise and have a big bucket ready below the spout to catch the coolant. The coolant will take a few minutes to fully drain. While it is draining, you can move on to the next step. |

|
Back up in the engine bay we can start by removing the Lid/MAF sensor/coupler assembly. Unplug the wire going to the IAT sensor in the air lid, then unplug the wire going to the MAF sensor. Unclip the 2 clips holding the front of the air lid down, and then unscrew the band clamp where the coupler meets the throttle body. Remove the whole Lid/Maf/Coupler assembly as one piece and set it aside. |

|
Now we can remove the tray for the lid/radiator support. It is held
down by 4 10mm bolts. Remove the bolts and tray/support and set it aside. Once that is removed, look for the 2 metal AIR tubes that are bolted to your exhaust manifolds/headers. There is one on each side, and each one is held on by 2 10mm bolts. Unbolt these and either bend the attached hose and tuck them away, or pull the AIR tubes out from the rubber hose and set the air pipes aside for now. |

|
Now remove all 8 plugwires.
Try not to pull on the wire, but instead pull on the boot that
connects to the coil. Next, disconnect the wiring harness that goes to the
coilpacks. It's a large white weatherpack connector, labeled in the photo. Next we need to remove the coil packs from each valve cover. On 98 LS1's, each coil pack is bolted to the valve cover separately. On 99+ year models, all the coil packs are on a bracket and the bracket is then mounted to the valve cover. Depending on your year, either unbolt all the coil packs individually ('98), or unbolt the 5 10mm double-ended bolts (using a deep socket) and remove the coil bracket with coils still attached. On 99+ year model cars, there may or may not be a bracket mounted to the backmost bolt. If there is, undo the nut and pry the bracket off with a big flathead screwdriver, and then unbolt the final bolt to remove the coilpack rail. The backmost bolts will be VERY difficult to remove, however, it IS possible with a deep 10mm socket, or a 10mm gearwrench. Both will get the job done. Once all the coil packs are removed you can see the bare valve covers. On the passenger side you may see 1 or 2 rubber hoses going to ports on the valve cover....unplug any hoses from the valve cover end only. On the drivers side you'll see a PCV hose going into the very back of the valve cover. Using a flathead screwdriver, pry it up and out of the rubber grommet in the valve cover. Now the PCV system is disconnected, and you can easily remove the valve covers. '98 cars have a few bolts around the outside border of the valve covers, while '99+ cars have 4 8mm center bolts going through the valve cover. Remove both valve covers and set them aside. |

|
Using an 8mm socket, unbolt the center bolt that goes through each rocker arm. There are 16 of them, 8 on each side of the motor.
It will take a bit of force to break the bolts free at first, so be VERY careful and make sure the socket is on the bolt head tightly
or you'll risk rounding it off. Once you remove each bolt you can pull the rocker out along with the bolt and set them aside. It is
generally recommended you keep the valvetrain stuff in order as you remove it just in case you spot a problem later, that way you can
go back and look at the specific valvetrain stuff and see what else might be wrong with that cylinder/valve. Once all the rockers are out, pull out all the pushrods, and remove the rocker pedestal rail. |

|
Next, grab a 15mm wrench and place it on the belt tensioner bolt as shown in the pic. Compress the tensioner by applying force on the wrench and slide the belt off of any pulley (the water pump is usually easy to slide the belt off of) and release the tensioner slowly. Remove the belt and set it aside. |

|
Now things start to get a little messy. Using a pair of pliers, compress and slide the spring clamps off the 4 hoses that go to the water pump. There will be 2 smaller hoses going into the passenger side of the pump, 1 big one going to the passenger side of the pump, and one big one going in towards the center of the water pump. Once the clamps are all slid back some, pull or pry (using a large flathead screwdriver) the hoses off the pump. There are also 2 very small hoses going to the fill neck on the radiator. Unclamp those at the radiator and leave the other end connected. Coolant will most likely start pouring out of some of these hoses. You can try to catch some of it in a bucket but I usually just let it hit the ground. |

|
Now, there are 6 10mm bolts that hold the water pump to the block, 3 on each side. See diagram of the pump on the left for their locations. Unbolt all 6 bolts and remove the water pump from the car. Coolant again will start leaking once you loosen all the bolts, it's inevitable. Don't worry about it. |

|
If you have a power steering cooler
inline in your upper radiator hose, go ahead and disconnect the radiator end of
that hose from the radiator, and we'll leave the whole hose in the engine bay
for the rest of the install (so we don't have to mess with those power steering
lines). Now, this part is tricky. We need to remove the radiator. First, get under the car with a small flathead screwdriver and unclip both fan electrical connectors (using the flathead screwdriver, as it's nearly impossible to do with your fingers). While you are under there, also unclip all the plastic wiring rings holding the wiring harness to the fan shroud. You're all done under here, go ahead and get back up to the top of the engine bay and get a friend to help with the next part. |

|
Loosen the AC drier clamp and lift the drier up a little bit out of the holder. This will make it easier to move the AC hose out of the way of the fans when we pull the radiator/fans out in the next step. Make SURE the drier can doesn't touch any leads on the battery...I recommend covering the battery terminals with a towel. |

|
Now, you have a big assembly here....the fan shroud is mounted on the radiator
via 4 slide in tabs, and on the front of the radiator the AC condenser (looks
like another radiator) is attached to the radiator with 4 tabs. We need to
slide the AC condenser UP about 2 inches to dislodge the tabs and get the
radiator free from its grasp. This will take some cursing and a good light
source so you can see the 4 slide in tabs I'm talking about. Once the AC
condenser is loose from the radiator, both of you need to lift the radiator up
and out. Lifting the radiator up and out....that sounds so easy doesn't it? HA! This part can sometimes be frustrating, so be patient. While trying to remove the radiator, you'll need to make sure that on the drivers side you don't catch on the AC condenser hard lines. The large coolant hose will want to snag on things. Keep wrestling with it until the radiator/fan assembly comes out totally, and set it aside. The AC condenser will stay in the car for the whole install. |

|
On a 6 speed car, put the shifter in
4th gear and make sure the parking brake is on tight. On an A4 car, you'll need
to drop the starter and either install the flywheel locking tool or wedge a
screwdriver in. The starter is held in by 2 13mm bolts for 99+ models or 2 15mm
bolts for 98 models and is on the bottom rear passenger side of the engine. You
can leave the wires attached. Once the engine is locked down from spinning, use your large breaker bar, a 3" extension and a 24mm socket on the crankshaft pulley bolt that goes directly into the crank through the center of the large pulley. You may need a 2-3 foot extension of pipe to slip over your wrench to break this bolt free. Once it's broken free, you should be able to unscrew it by hand. Once the bolt is out, either thread it back in 4 full turns, or if you purchased a 1" longer metric crank bolt, install it all the way at this time. |

|
Now install your 3 arm pulley
puller, mounting the hooks of the three arms on the inner part of the stock
pulley. If you already have an underdrive pulley on there, either pull it off
using a 3 screw type puller, or be VERY careful and grab onto a lip of the
underdrive pulley (on the f-body ASP pulley there is a ridge half way back that
can be pulled on safely with a 3 arm puller). Keeping the pulley puller arms
all secure and aligned, begin to tighten the bolt on the puller and crank on it
until the pulley either comes loose, or hits the head of your crank bolt. If it
hits the head of your crankbolt, loosen the pulley puller, unturn the bolt 1-2
turns, and re-try it again. The key when you back your crank bolt out more, you
are putting MORE stress on less and less of the threads...however, towards the
end of pulley removal it will come off easier and easier so the stress isn't
enough to damage the crankshaft threads. If you get the pulley as far off as it'll come without totally removing the crankbolt and the pulley is still firmly on there, give it a good tug or a tap with a rubber mallet...it should be hanging on by just a hair at this point. If you have the longer crank bolt, this won't be an issue. |

|
Next, we'll unbolt the timing cover.
There are 10 bolts holding the timing cover to the engine, 8 on the front, and
2 on the bottom front of the motor. Remove all 10 10mm bolts. Remove the timing
cover once all bolts are out...it may be kind of glued at the bottom, just give
it a tug. Once the timing cover is removed, you can see into the oil pan. If you drop anything into the oil pan, you may have a nightmare situation on your hands so take the time right now and stuff a clean small towel into the front lip of the oil pan just in case you drop a bolt later. |
Part 2: Removing the cam
Time To Complete: 1 hour

|
Now look what's in there. The big
gear you see is the gear mounted to the end of the camshaft and is held on by 3
10mm bolts. The chain is of course the timing chain, and the big metal block at
the bottom is the oil pump. Unbolt the 3 cam gear bolts and remove the gear, letting the chain droop down into the oil pan for now. |

|
Thread 1 or 2 of the water pump bolts into the front of the cam and then spin the cam several times both directions with a quick snap of the wrist. Unbolt the cam retainer plate that is held on with 4 10mm bolts and remove it. |

|
Option 1JPR Lifter tool methodThis method is by far the easiest. You'll need to buy the JPR Cam install tool available from . .If you have these, it'll make this a no sweat operation. To install them, you simply slide them into the 2 holes in the front of the motor. The one marked "L" goes in on the passengers side of the motor, and the one marked "R" goes on the drivers side of the engine. The tool head will face up and outward as shown in the image. If it seems the tools are tough to get in, try spinning the cam a couple more times and slowly sliding the tool in. Once both are in, the lifters are locked into place making it impossible for them to fall! Great! |

|
Option 2Pen magnet methodIf you don't have the tool in option 1, the next best thing is to go buy 16 retractable pen magnets from Walmart/AutoZone/wherever you can find them. The heads on the magnets need to be small as the opening to get to the lifter is a little less than 1/2" in diameter.Once you have the magnets, extend the magnet about 6" and put it down the pushrod holes in the head. You should feel it 'snap' onto the lifter and at that point you should be able to push the lifter up and down. Rotate the cam some while doing this so you can understand how this works. The lifter rides on the cam, so you need to make sure (by spinning the cam) that the lifter is UP away from the cam. The magnet is there to help the lifter stay up, so you need to squish the retractable part down and bend the pocket hook on the pen magnet outwards some to grab on to the head. Hooking the pocket hook onto the bolt hole for the rocker arm bolt usually works well. Install all 16 magnets to hold up all the lifters. Now, spin the cam and if ANY of your pen magnets move when you do this, then that lifter is hanging down too low. Use the magnet and spin the cam to hold the lifter up higher. |

|
Option 3Russian roulette methodNow, this method has been in use for years and requires no magnets or special tools, however, it is prone to disaster. Below the LS1 cylinder head, there is a plastic "lifter cup", and when you spin the camshaft the lifters go up deeper into the plastic holder and friction alone keeps them from falling back down. I personally have done 8-9 cams using this method and I never had an issue, however, on the 10th cam I tried to do there were 2 lifters that quite simply just wouldn't stay up. That is when the magnet method or the JPR method become necessary, not just recommended. After seeing several LS1's now with lifters that would just *barely* stay up, there's no way I'd ever attempt this, but if you're feeling lucky give it a shot.Basically, all you do is spin the cam a few times and that's it. Turn off any bass coming out of your speakers, hope there is no thunder or earthquakes, and say your prayers. If a lifter falls, don't say I didn't warn you, I don't care how many buddies you know that have done a cam swap this way. ;) |

|
Now that the lifters are up off the cam, there is nothing
keeping the cam in there. Let's pull it out! Grip the bolts on the end of the cam, and gently start pulling the cam out while trying to keep it supported and level with the bolts. The key here is to be gentle with this part. The cam will need to be slowly spun as you are removing it. You need to envision what is going on inside the motor, your cam is basically going through a few holes that suspend it. Once you pull the cam out a bit, it's going to drop down some and the lobes are going to be getting caught on the cam bearings in those holes, which is where the gentle spinning and tugging comes into play. Whatever you do, don't force the cam if it feels like it's caught, just keep turning until it wants to naturally slide out more with gentle force. Once the camshaft if 1/4 of the way out, use 2 hands and try to leverage the end of the cam to keep the whole camshaft even, rather than dragging it out of the engine. Once you support the cam with two hands you'll see it's much easier to remove as it's not getting caught on everything inside. |

|
Once the cam is about 70% out, Have a
friend move the AC condenser UPWARDS at about a 30 degree angle. If you do not have
a buddy handy, you can use a bungee cord to tie the condenser up and tether it to the
hood latch. Move it up
until you have just enough room to pull the cam out totally and set it
aside. Note that the AC condenser lines are not designed to flex TOO much so
only move it up out of the way as far as you need to for the cam to be removed. Another method that may work just as well is rather than lifting the condenser up out of the way, you can drop it down towards the ground instead. Whichever method you use, the key is to put as little stress on the metal AC lines as possible. Now, pull the last bit of the cam out and set it aside. |

|
OptionalNow, if you are the curious type, you may want to measure the base circle of your new cam before you install it. If you have a vernier caliper, place it on one of the lobes and compress the caliper with your hand. Spin the cam slowly until you find the lowest number the caliper ever reads. This is approximately your base circle. Yours will probably be somewhere between 1.45" and 1.50". It may also be a good idea to measure the stock base circle just to compare. The new cam should have a smaller base circle.End of optional section |

|
Now we need to prep the new camshaft. If you have some wet towels or
brake cleaner, clean the cam. Try to get inside the center of the camshaft (it's hollow) to get any gunk out of there. Some
cams come very filthy from the vendors, some come very clean. It's always a good idea to check. Now, grab some fresh motor oil and pour it onto the new cam. Get everything coated nicely. |

|
Remove the water pump bolts from your stock cam and thread them
into your new cam. Have your friend suspend the A/C condenser again and work the new cam in exactly the opposite of
how you removed the stock one. SLOW and CAREFUL is the key here. You may find that the first 90% of insertion isn't too bad,
but the last 10% can be kind of tricky. You have to try and support the cam and keep it level to get it up into the
last hole inside the engine. Just keep turning it, lifting it, and wiggling it in and eventually it'll go right in. Once in, re-install the cam retainer plate and its 4 10mm bolts. I usually put some Loctite® on the 4 bolts and the GM torque spec on them is 18lb/ft. |

|
Optional: If you purchased a new oil pump and/or a new chain, you'll need to complete this step.First, unbolt the 4 10mm bolts holding the oil pump to the engine block, making sure not to drop any into the oil pan.Now we need to unbolt the oil pan to lower it some. It is held on by 8 or 10 bolts around the perimeter, some M8 and some M10 (10-12mm hex head bolts). You should be able to loosen them all enough just to get the pan to drop 1/2". It may need some prying to break it free at first. Next, grab a 10mm wrench and unbolt the pickup tube bolt...it holds the pickup tube to the oil pump. Then once it's loose, unthread it and remove it with your fingers making sure not to drop the bolt into the oil pan. Now grab the pump with one hand and with your other hand or a screwdriver, push the pickup tube downwards into the oil pump to separate it from the pump. Once it's separated, pull the pump off the front of the engine crankshaft. You can now remove your old timing chain if you need to. Place the new chain over the crank snout and let it droop down like before. Leave the oil pump off the car for now. End of optional section |
|
This step is one of the KEY parts of
the install. If you mess this part up, you risk major engine damage once you
try to start the car up later on. However, we'll verify everything is right
before we go further, so don't worry too much. The goal here is to get the cam
gear back onto the front of the cam, with the chain in place. That part is easy
enough, the hard part is getting the dots lined up. There is one dot on
the face of the cam gear, and one dot on the front of the crank gear (behind
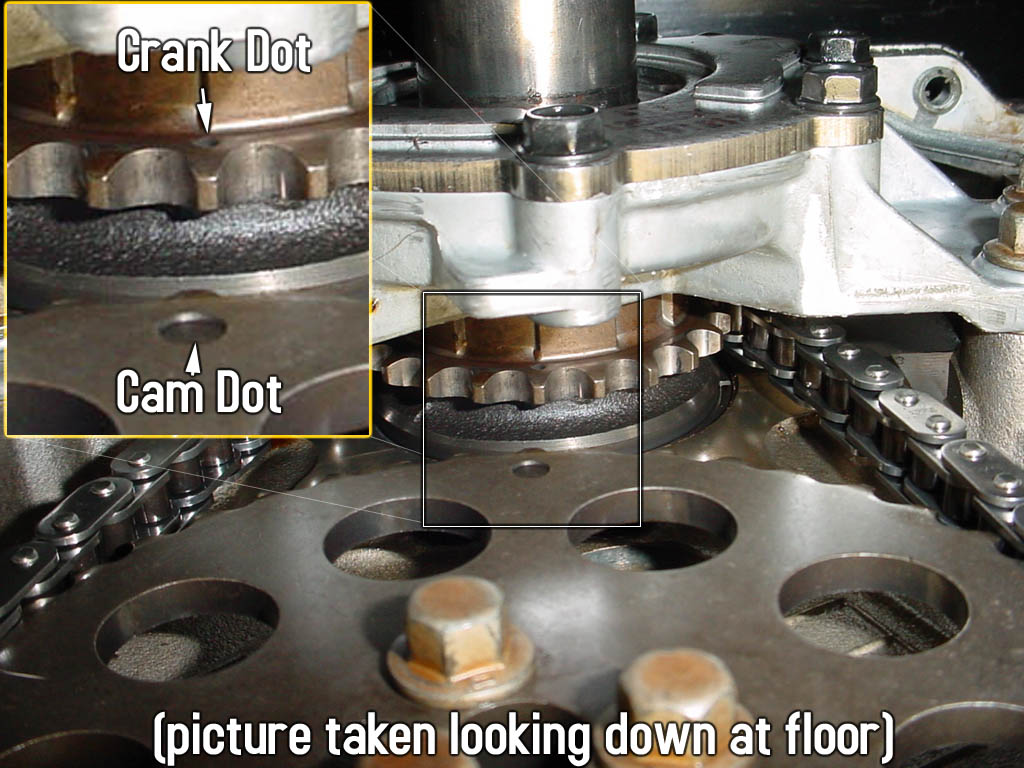
the oil pump). Thread your old crankshaft bolt back into the crank and with a wrench, turn the crankshaft until you see the small black dot pointing straight up. See picture on the left for reference. Next, in your hand, orient cam gear so dot is on bottom and hold it up to the front of the cam....see the smaller 4th hole in the cam gear? That is where the cam alignment dowel goes in. Spin camshaft by hand so dowel looks like it'll line up with cam gear properly to align the dots. Put the timing chain on the crank gear, and then put it on the cam gear, holding the cam gear up with your hand to keep tension on the chain. Carefully try to get the camgear to seat on the front of the cam. If you don't get the hole and the dowel aligned just right, you're just going to push the cam back into the block. If you are having trouble aligning it, try threading a cam bolt through the gear into the cam to grab it and line it up like that. Most likely you are going to have to keep moving the chain on the cam gear until you get the dots lined up just perfect, and you'll have to get lucky and have the cam oriented just perfect so the gear seats on like it should. If all this sounds complicated, just look at the picture on the left and make yours look exactly like that. :) Don't get mad if this part takes 20-30 minutes of trying until it all looks correct. Once it's all together, make 100.000% sure the dots are lined up exactly. You can't be off by a few degrees due to the sprocket/chain setup, you can be off by one tooth at the minimum so if you are off you'll see it. If it looks off a little bit, turn the crankshaft by hand again to see if the 2 dots do indeed line up when they are straight up and down...sometimes if your crankshaft is 5 degrees too far, the cam gear will look like it's off 10 degrees or so and you'll think there's no way they'll line up exact...when in actuality you just needed to get the crankshaft straight up. Now bolt the cam gear to the cam using the old 3 10mm bolts, again, placing Loctite® on the threads. These should be torqued to 26lb/ft. |
|
|
Optional: If you removed your oil pump in the previous step, you'll need to do this to reinstall itFind your oil pump pickup tube O-ring, it may be brown or blue in color. It will either be inside the opening of your stock oil pump, or it'll still be on the snout of the pickup tube. If it was inside the oil pump, remove it and place it on the snout of the pickup tube...just seat it on there, don't force it down any more than it wants to go naturally.If you bought a new oil pump, get it out now and place your old pump aside. Now, push the pickup tube downwards with one hand, and with the other, try to line up the gear on the oil pump with the gear on the crankshaft and push it on. Again, this may take a few minutes to get the gears all lined up. Once the pump slides on, rotate it a little and try to line up the snout so it'll slip into the oil pump nice and centered. If you try to insert it off center, you run the risk of chewing up the o-ring which will mean you have very little oil pressure and have to tear all this apart to get back in here to replace it. You don't want that, so make sure you insert the pickup tube nice and centered. It shouldn't take much force at all to push it in. Once it's in, apply Loctite® to the old pickup tube bolt and re-install it. The torque specs are about 9 lb/ft, so just tighten it with a small wrench so it's snug but don't go crazy on it, as it's a really small bolt and the threads will strip out with too much force. Apply Loctite® to the 4 10mm oil pump bolts and reinstall them, torqueing them to 18 lb/ft. Now, retighten up the oil pan bolts. The smaller bolts get torqued to 106 INCH lbs, or about 9 foot lbs, while the bigger bolts get torqued to 18 lb/ft. Note: You WILL break those smaller headed bolts if you go past the 9 lb/ft as specified. End of optional section |
Part 3: Changing the springs
Time To Complete: 2-6 hours

|
Now we start the 2nd big job of the install....changing the springs. Before we get started, I want to show you the parts that we'll be dealing with. The most obvious part is the valve spring. Under the valve spring is a metal "spring seat". The seat sits on the head, and the spring sits on the seat. The valve stem goes straight up through the center of the spring and at the end of the valve stem is a hat. The hat is called a "retainer", and it is locked into place using 2 pieces of curved metal called "locks". The spring is basically sandwiched between the seat and the reatainer, and the retainer/lock combo is what holds the valve up from falling into the engine. Now, on 2001 and later LS1's, integrated with the seat is the valve seal...this is basically a seal that keeps oil from going down the valve stem hole and into the intake or exhaust port. On 1997-2000 LS1's, the valve seal is a separate piece that must be removed to get the seat off. If you are not replacing spring seats (most setups will not require this), then you do not need to worry about seals or seats so you can skip those steps below. |

|
Okay, let's get to work. The first thing we need to do is remove all 8 spark plugs. You can do this
with a normal 3/8" drive ratchet and a 5/8" deep socket. Sometimes a 1 inch extension is handy, but for the most part no
other fancy adapters are needed. Now that the plugs are removed, we need to figure out a way to keep our valves from falling into the cylinder, since when we remove the spring and retainer NOTHING but friction will be holding the valve up. If it falls, it could spell disaster. There are a few options for this, but I'll detail the 2 I like to use. |

|
Option 1Use an air compressor and spark plug fitting to pressurize the cylinderThis is probably the easiest method if you have an air compressor. It will require you to get a special air hose fitting that lets you screw into the spark plug hole. These come in many of the leakdown testing kits as well as a cylinder pressure testing kit. All you need to do is remove the schrader valve in one end of the hose, screw it in, and hook the other end up to an air supply set at around 60-80psi. Once the cylinder is full of compressed air, the 2 valves for that cylinder will be locked up in place. |

|
Option 2Top dead center methodThis method requires you to put the piston at the highest position in the bore, so that when you start to compress the spring, the valve can only drop until it hits the piston. When the piston is at top dead center, the valve can't move very far at all.There are several ways to accomplish this: A) You can place a small stick/rod/straw/something into the spark plug hole and have a buddy turn the crankshaft by putting the stock 24mm crank pulley bolt in and turning the bolt with a wrench. You should be able to feel when the piston comes up to the top. B) This method is a bit more elegant. Rotate your motor over by hand until your cam gear and crank gear are dot to dot like you set them up as earlier. At this position, piston 1 and 6 should be at top dead center. You can change the 4 springs on these 2 cylinders now using the instructions below. After you change those 4, then, rotate the crankshaft a full 90 degrees, and the cam gear dot will turn 45 degrees, as if it is pointing to 7:30 if it were a clock. Now piston 8 and 5 are at the top and can be changed. Rotate another 90 degrees on the crank and your cam gear dot will now be at 9 o'clock. Piston 7 and 4 can now have their springs changed. And FINALLY, rotate the crank another 90 degrees and the cam gear dot will be at 10:30. You can now change your remaining four springs on piston 3 and 2. Once again, that's 1 & 6, rotate 90, 8 & 5, rotate 90, 7 & 4, rotate 90, 3 & 2. |

|
Now that the valve won't be falling down into the cylinder, we can compress the spring. Spring compressors come in so many shapes and sizes it's impossible to list them all. The stamped steel "crowbar" shaped spring compressor available from AutoZone/Napa, and is what I show in this document, however it has a history of breaking bolts off in the head! Use this tool at your own risk! Right now I'm going to recommend the amazing valve spring compressor tool from Scoggins Dickey, and the MORE tool from thunder racing. The tool from Scoggins Dickey will not fit on the back two cylinders on the passenger's side, but the other 6 cylinders work fine. For the back two, the MORE tool does the job great. Having both of these tools will make your life VERY EASY, but you'll also end up being poor. If you can only buy one or the other, get the MORE tool since the SDPC tool wont work on all cylinders. |

|
Install whatever spring compressor you chose, and start compressing the spring. Now, if the VALVE stem is moving down with the retainer, you may need to tap the retainer lightly with a hammer to pop the valve out of the retainer (sometimes they are sort of wedged in there really good). The valve stem should be sticking up ABOVE the retainer at this point! |

|
Once you've got the spring compressed enough, the 2 metal locks should be just sitting in there next to the valve stem. Using a magnet, you should be able to easily remove these locks. If they are still stuck in there, you may need to compress the spring a little more. |

|
The locks are removed, so literally the only thing holding the spring down now is the compressor. Unbolt the spring compressor and remove it. You can now pull off the spring and retainer! |
|


|
Now, toss your new spring onto the seat and place a retainer (new if you got them, otherwise reuse the stock ones as long as the springs accept them) on top of the spring. Install the spring compressor like you did before on this new spring/retainer combo and make sure when compressing the spring that the retainer opening stays as centered as possible around the valve stem. You don't want to snag the retainer on the valve stem while you are compressing the spring. |

|
Now put the locks in. If you are using a tool where you have to manually
compress the spring by hand as you are installing the locks, it may help to put a dab of grease in the inside of each lock...this way you can
"stick" them to the valve stem and that'll keep them from falling out as you mess with the spring compressor. It's a handy trick if the you
are having issues getting the locks in. Once both locks are in place, SLOWLY decompress the spring and make sure they lock into place. The locks need to lock into a groove on the end tip of the valve stem so you should be able to easily tell as you decompress it if it worked or not. |

|
That's it! Repeat the above for all 16 springs and you're done!From this point on, it's all reassembly! The hard parts are over. You can start by putting the 8 spark plugs back in to the motor if you removed them. Put a dab of anti-seize on the threads and HAND thread them into the hole to ensure you do not crossthread them in. It is a good time to put in brand new plugs. NGK TR-55's with a plug gap around 0.045-0.55 seem to be popular for engines without nitrous, while NGK TR-6 plugs are better for cars with nitrous. |
Part 4: Reassembly and testing
Time To Complete: 1-2 hours

|
Let's get to reassembling this beast so we can fire it up! Insert all 16 pushrods, place the rocker pedestal back on the head, apply Loctite® to all the rocker bolts and reinstall all the rockers. Torque the rockers to 22lb/ft, rotate the crankshaft 180 degrees and double check the torque on all the rocker arm bolts. Now, using your 24mm socket wrench, turn the motor over by hand (should be difficult as you are now building compression) and make sure the motor turns over by hand 3-4 turns. If you feel the crank get stuck at a certain point to where it does not want to turn anymore, you somehow messed up the degreeing of the camshaft, or your cam is WAY too big to clear stock pistons. This check is NO substitute for a real piston to valve clearance check, but it will catch any gross errors like lining up the dots VERY incorrectly. Assuming all went well, let's move on. Place your valve covers back on the heads and bolt them down. The valve cover bolts do not need to be tight, as the valve covers use a rubber gasket to seal. "Snug" is fine, or if you are a perfectionist the torque spec on the bolts is 9 lb/ft. Re-attach any PCV connections you removed. Now reattach your coils, and reattach the plug wires but DON'T plug in the big white coil pack wiring harness yet. For the coil end of the wire you'll hear it snap twice, and for the spark plug end you'll feel it snap onto the plug. I usually put a dab of dielectric grease inside both ends of the wire before I reattach it. Finally, reinstall your 2 AIR tubes if you removed them earlier and torque the bolts to 15 lb/ft. |

|
Now, we need to put the front cover back on; however, it's best to not reuse the front seal that is pressed into the hole in the middle
of the cover. Using a big flathead screwdriver and a hammer, hammer the seal out from the back of the cover as shown
in the picture. Hammer all around the seal and work it out. This may require some pretty heavy hitting with the hammer. Once you have removed the seal, place your new seal centered on the hole. Using a block of wood or very careful hammer placement, tap the front seal into the hole. Again, this may take some trial and error as when you hammer one side in, the other will pop up. That is where the block of wood comes in handy as you can hammer the whole seal in equally using it. |

|
Now that the new seal is in, you need to place a bead of silicon RTV
gasket maker along the bottom edge of the timing cover. If there is some RTV leftover on the bottom, scrape it off before you
apply the new RTV. Now place the cover on the front of the engine (make sure you have the timing cover gasket in place, and oriented the correct way (it is NOT symmetrical!)) and hand start all 10 bolts. At this time do NOT tighten any of the bolts. Just get them started a few turns and let's move on. |

|
Seat your pulley back onto the snout of the crankshaft as best you can by hand.
If you purchased a longer crank bolt which I *highly* recommend, start threading this in now and pull the
pulley on about a 1/4 or 1/2 an inch and remove the longer bolt. Use your old
stock crank pulley bolt to pull the pulley onto the crankshaft until the bolt seems
to get impossible to turn. Grab your biggest torque wrench and attempt to torque
that bolt down to 240lb/ft. I have always stopped at 200lb/ft on my installs and I've
never had a problem, so if you can't hit 240 (which I never have), don't worry about it.
Now, break the bolt free and remove it. NOTE: If you did not buy a longer crank bolt, and you are reinstalling the stock pulley, you run the risk of stripping out the first few threads of the crankshaft. This will NOT be fun to fix! Take your NEW crank pulley bolt and thread it in all the way by hand. Torque this bolt to 37lb/ft. Now, we need to stretch the bolt into place. Get your breaker bar and pipe extension, and try to turn the bolt 140degrees past where it is at now, keeping in mind the engine will be trying to turn some and those are degrees you can't count. Again, I always seem to get about 90-100 degrees worth (estimating, knowing what 90 degrees looks like) and leave it as is so don't worry about going crazy here. Once the pulley is installed, the timing cover should be nice and centered around it, so we can now tighten all 10 of those timing cover bolts. Torque them to 18lb/ft on the bolts you can get a torque wrench on, and just make the others you can't get the wrench on about as tight as those. Reinstall the A/C belt at this time. |

|
Reinstall the water pump now, using new gaskets if you bought them.
Hand thread in all 6 water pump bolts as far as you can, then finish the job off with a wrench.
Torque the water pump bolts in a 2 pass sequence, first to 11lb/ft, then do a second pass and
tighten them to 22lb/ft. Connect the 2 smaller heater hoses going to the side of the water pump now. You can now reinstall the main drivebelt by compressing the belt tensioner with a 15mm wrench. Now work the radiator back into place. This may take some effort, and you'll need to make sure the A/C condenser tabs slide back into the radiator slots so they are locked together. Once it's all back in, now reconnect the 2 big hoses going to the water pump, and reconnect your coolant vent tube that goes from the throttle body (or under the throttle body if you have a coolant bypass installed) to the radiator neck. Also reconnect the as well as the radiator over flow hose to the radiator. Get under the car and re-snap all the wiring harness back into place on the back of the fan shroud. You can now plug in both the fan electrical connectors as well. |
| ||||


|
|
Now reinstall your air tray/radiator support making sure you seat it properly onto of the radiator. Place your air lid/maf assembly in place and slide the bellow onto the throttle body and tighten down the band clamp. Slide the lid into place and snap the clamps down. If you removed your strut tower brace, reinstall it now. |

|
Now we need to do a final check on everything.
Go ahead and start to fill up the radiator with coolant. Put in one whole jug of Dex-cool® coolant. Do NOT use green coolant,
only orange Dex-cool® certified coolant. Once you pour a jug in, fill the jug with water and pour that in. Keep pouring until
the radiator is full, and then keep the jug with water handy as we'll need to re-fill the radiator in a bit. Now double check your oil level, go over the engine bay and look for ANY loose connections, hoses, belts, wires, etc. If all looks good, go ahead and reconnect the battery cables and we're ready to rumble! |

|
Now, make sure the radiator cap is removed and the coil pack main wiring harnesses are disconnected (one big white connector on each side).
Get in the car. Insert the key, pray, and turn the motor over for 4 seconds...it won't start as long as you've disconnected the coil pack wires.
If you heard a god awful noise, you screwed something up. Chances are the cam is either too big or the cam was not lined up right with the
timing marks on the crank! THIS IS BAD, however, I know you followed my instructions so this didn't happen to you :) If the car turned over fine, connect the 2 coil pack harnesses. Now, PREPARE YOURSELF. There are a few things you need to know before you turn the key:1) The engine is going to be REALLY noisy for about 4-5 seconds. This is because the lifters need to pump up with oil.2) Your oil pressure needs to be watched like a hawk on this first startup. It will sit at zero very briefly, and within 3-5 seconds it should come up to 30-50psi at idle. 3) Smoke will start coming out of your engine bay like mad for the first 5 minutes. This is normal and is just coolant/oil/grease/fingerprints burning off all the stuff you touched. 4) The car may fire, and then die. You need to restart it if this happens and next time, give it 10% throttle and just try to keep it idling. Some year model cars take time to "learn" the cam so it may try to stall before then. Are you ready?Now...Turn the key being sure to keep an eye on the oil pressure gauge. Make SURE oil pressure comes up within 5 seconds (it'll take a few seconds since the motor has been apart and you may have swapped the oil pump) and if it doesn't, shut the car off. The car should idle really poorly (depending on how big you went with the cam), and rpms will fluctuate a lot. If it keeps trying to die, give it 5% throttle just to keep it idling and slowly back the throttle off until it knows how to stay alive on its own. If all is going well, let the car idle up to full temperature, making sure to constantly watch the radiator and refill as necessary.Once the engine reaches full temp, reinstall the coolant fill cap and you are ready for your test drive! For the first day, cruise around in the car as long as you like and get the car nice and hot, but don't take the RPMS over 4000 until the springs have a chance to cool overnight. The next day you can take the car to redline, just remember that HIGH rpms on stiff high performance cold valve springs is bad, so from now on make sure your engine is warm before you beat on your car. OEM valve springs are MUCH more forgiving than high performance ones, so treat your motor nicely! Final Notes:- After you have 100 miles on it, it's probably good to go change the oil, re-check the coolant level and power steering level, and enjoy!- Remember, with stiffer valve springs it becomes more important to make sure your car is fully warmed up before you take it to high rpms, as the springs are more brittle and prone to breaking when cold. - If you have a check engine light, use an autotap scanner to pull the codes. A common code at this point is P0300 (Random Misfires), and may happen from time to time when idling depending on the size of your camshaft. This is nothing to worry about, and if it bugs you, tuning can get rid of it. - Your car will try to die once you rev it up some and let off. This will make it difficult to drive at first, but after 100-200 miles of city driving it will learn itself out. If it doesn't, programming will be able to fix the issue or you can drill a bigger hole in your throttle body blade to let more air in at idle. - More valvetrain noise is normal, depending on the ramp rates your new cam has. More aggressive cams WILL make the engine sound like a sewing machine, especially when you are inside the car driving with the windows up and radio off. This is normal. Congrats! You have finished installing an LS1 cam and springs!Enjoy your new power, and email me to let me know your success! I love to hear when people use my site! :)I'd like to thank: - for supporting this article- Joe Prince Racing for making a great tool to hold up the lifters - Jason99TA, Patches, -Joseph-, Reckless, Country Boy, Visceral, TA GRRL, and RobertBartsch for offering some tech advice and/or proof reading feedback - MOBE for letting me photograph his car for the write-up |
Frequently Asked Questions
1) Do I need to change my timing chain?
Well, that all depends. If you've got a car with under 36k miles on it and you aren't going too extreme with the cam, I'd say you'll be just fine. If you've got a higher mileage car, or a cam that is bigger, you really should replace the chain. An important thing to note is that to change the timing chain, it means you'll have to pull off your oil pump. This adds a little risk to the install as the O-Ring that seals the pickup tube to the oil pump gets pinched every once in a while. If that happens, you'll find yourself tearing the engine back down to replace the O-ring. Not fun.2) Which Timing Chain should I get?
There are a few timing chains to choose from. There are upgraded single roller chains that are a little beefier, like the JWIS chain Thunder Racing sells, and there are also some double roller timing chains which are actually like 2 chains in one. The double roller setup will be VERY strong and very hard to break, however it requires a little more effort to install including pulling off the lower cam gear, and shimming the oil pump. It also makes bolting in the pickup tube more difficult as the pump is now shimmed outwards. If you are up for the extra effort, the double roller is worth it.3) Do I need to replace my oil pump?
If you have a 98-00 model LS1, and you are replacing the timing chain, I'd say the answer is a resounding YES! If you have a later model LS1 then it is less of an issue as the quality control did seem to get better on the oil pumps (early ones would fail, toasting a motor). If you do end up buying a new oil pump, definitely get a new timing chain as the install will be "free".4) I looked at your cam guide but still don't know which cam I should get
If you are a novice and new to engines, you will NEVER figure out what cam is right for you without trying a few. I myself have gone through about 7-8 cams before I found the one I liked the most. For me, a 114LSA was more my taste and mid to high 220's duration was about what I can stand without being annoyed at all by drivability issues. Just pick a cam close to what you think will be good, or go with what a buddy has used. Don't get caught up in a few horsepower here or there, a 2-3 degrees, 10 thousandths lift, just go for something in the general area and work from there. If you plan on putting a cam in ONCE and only once, go with something countless others have used so you can put it in and not worry about if you made a good choice, and don't look back.5) Should I buy titanium retainers?
If you will be revving the car up above 6500rpms and have aggressive cam lobes (like a Comp XE-R lobe) then yes, I think you should get titanium retainers. Is it required? No.6) Can I drive on stock tuning?
As long as you choose a mild to average camshaft, stock tuning is probably going to be just fine. It will not be best for power or drivability, but it will get you around. An A4 with stock tuning will probably be able to handle less of a cam than a 6 speed with stock tuning due to the fact an A4 has more of a load on it at idle and idles lower. Some people with 6 speeds daily drive cams over 230 duration with 112LSA using the bone stock factory tuning, and while the car may stall from time to time at idle, it can get you around and to work everyday. The tuning will just smooth the rough edges and get some more power out of the combo.7) Why do you not recommend assembly lube and a 30 minute camshaft break-in?
LS1's have a roller cam, so motor oil and no camshaft break-in is perfectly acceptable. A couple of heat cycles on the springs is all you will need.8) I got my car all back together and the oil pressure is very low
You probably pinched the oil pump O-Ring while changing the timing chain or oil pump. You should probably get back to the oil pump and pull the pickup tube to inspect the O-ring. If it is torn, you'll need to order a replacement from GM. I would not recommend using a generic replacement rubber O-ring.9) How do I know which length pushrods to use?
Well, if you've installed a cam with high lift, your base circle will be smaller. Since the base circle is smaller, even if you have heads that have been milled 30 thousandths of an inch, 7.400" long pushrods will likely be good. If you have severely milled heads, and a cam without extreme lift, 7.350" pushrods may be better.10) Can I reuse the stock rocker arms?
Yup, the stock rocker arms will be fine. In fact, higher ratio rocker arms are not recommended at this time as it exagerates the cam ramp rates and could be even more harsh on your valvetrain. Since you put are putting in a cam, you might as well just get it with the right lift and duration with a 1.7 rocker arm. However, there are some nice replacement 1.7 rocker arms on the market and they would be fine.
11) I installed a double roller timing chain and it seems my ASP underdrive pulley is interfering with the oil pump. Is this right?Yes, in some circumstances (especially when using a corvette ASP pulley), the ASP pulley will need to be machined for clearance when using a double roller timing chain. The picture on the right illustrates the machining required. |

|
E-Mail me if you used or enjoyed this article
Feedback and hearing people's experiences when using my instructions is very important to me. If you used these instructions, drop me a line and let me know how it all went.- jmX